Fitting an Angelus 240cal into a 47mm Case Author Ross McSherry
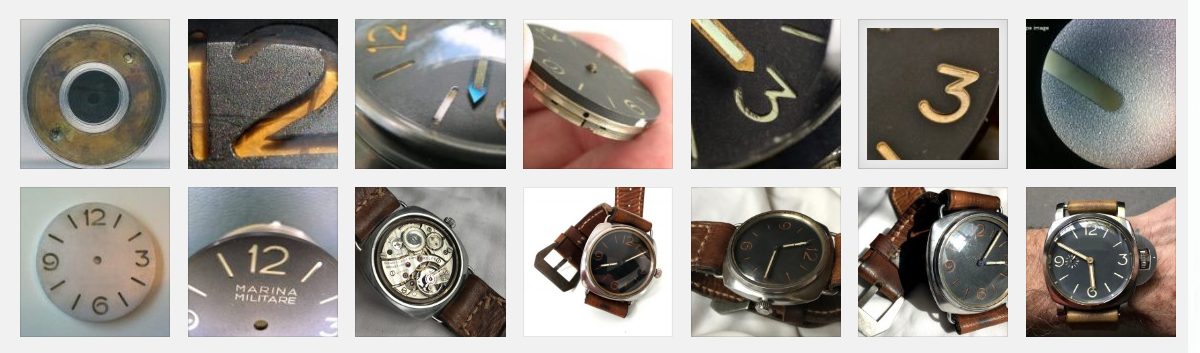
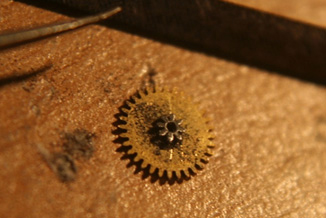
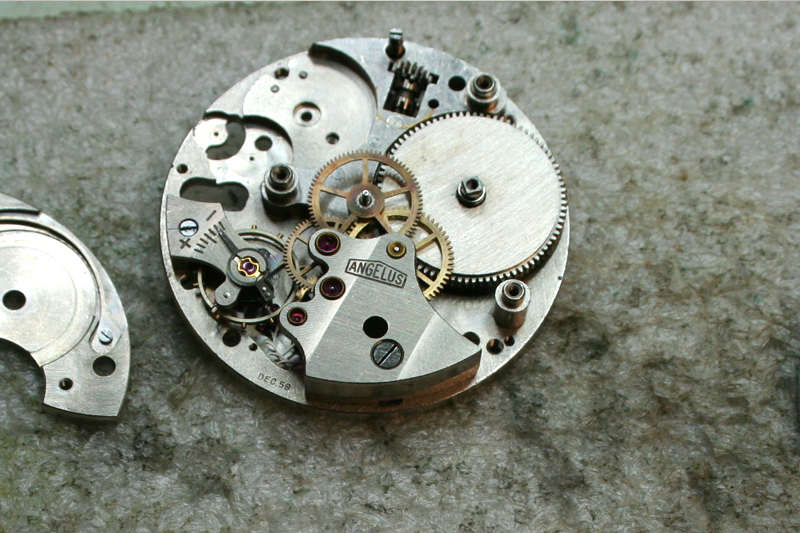
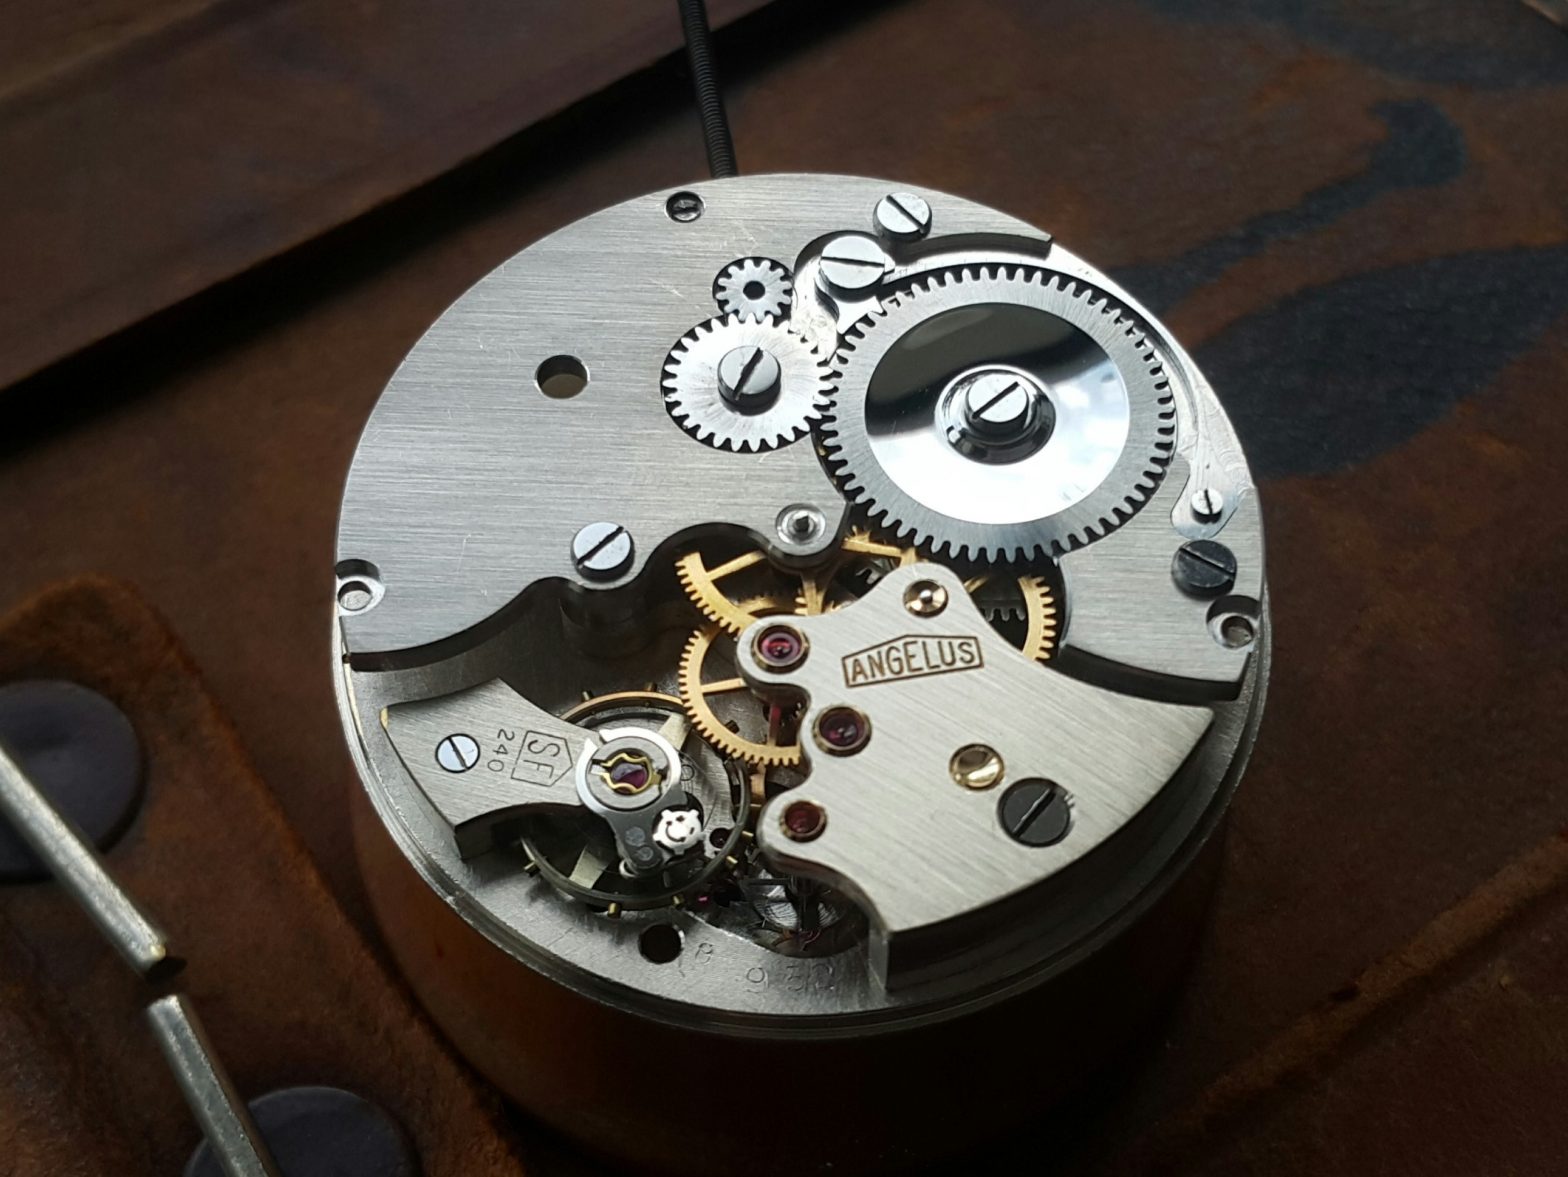
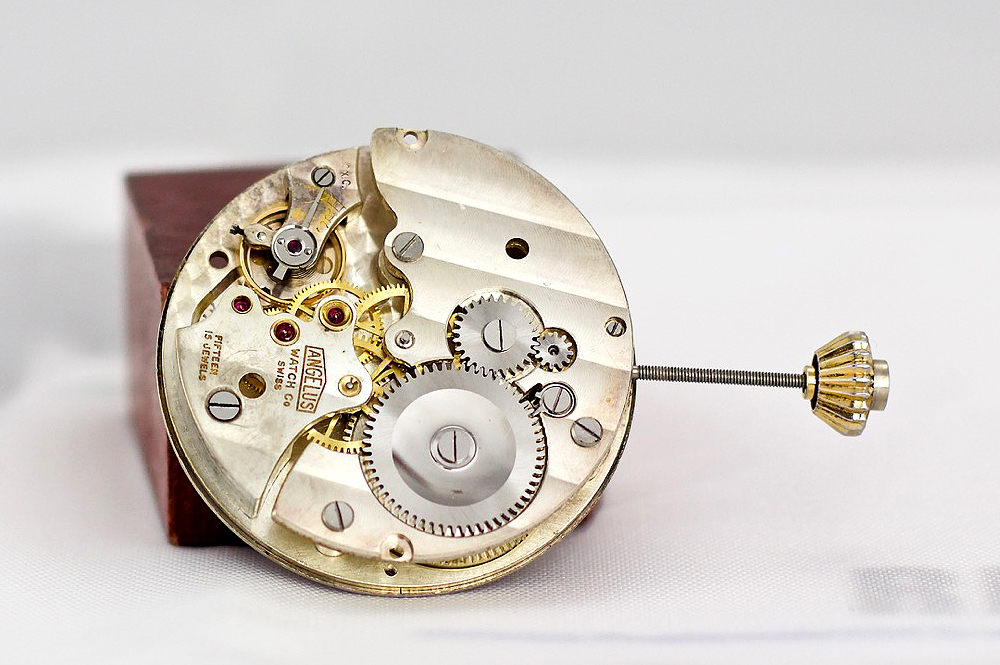
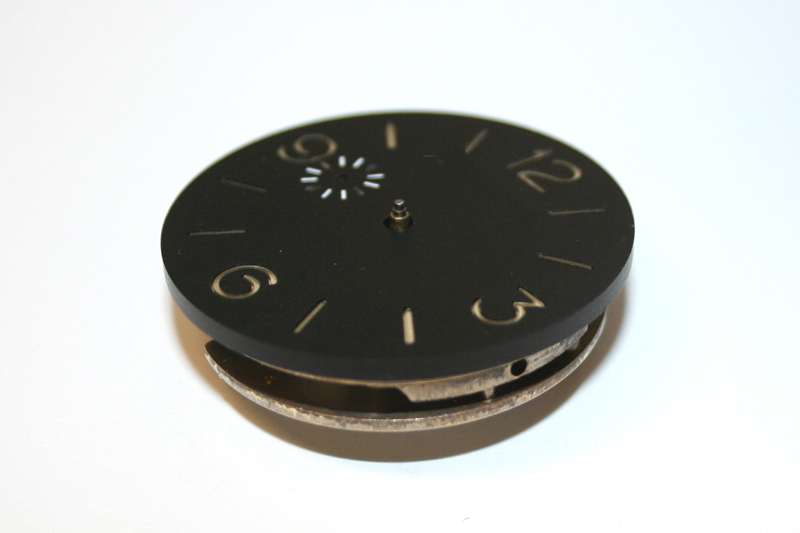
This tutorial covers some of the basics of fitting an Angelus cal.240 to a 47mm watch case. Assuming you’ve found an Angelus clock, you’ll have something that looks a little like this. Some of the movements are different to this; in which case you’re job is probably easier and some of these steps can be skipped.
1. Remove the extra plates on the front and back. These are highlighted in green, and secured with 3 screws – you won’t be needing any of this anymore. On the back of the movement, a larger wheel may be over the hour wheel. This is for the alarm, you won’t be needing this either.
2. There may be a small winding pinion that extends through the train wheel bridge. This should pull out from the back and won’t be needed any more.
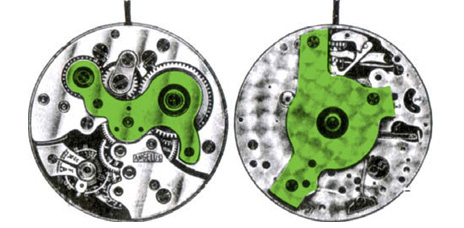
3. Now remove the levers shown in green on the movement above. This requires a small screwdriver; the alarm hammer shown on the left is sandwiched between the top and bottom plate. A small pair of wire snips will cut through its pinion, and it will simply drop out. Be careful not to create any unnecessary shocks on the movement, and collect clipped pieces of wire! If you’re feeling confident, taking the barrel bridge off from the front and removing this alarm mechanism is a better option.
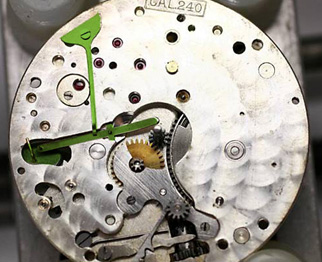
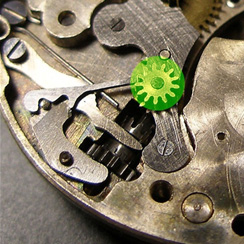
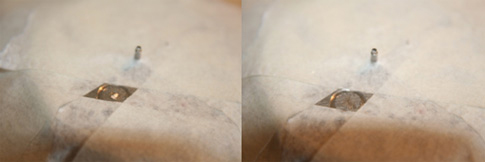
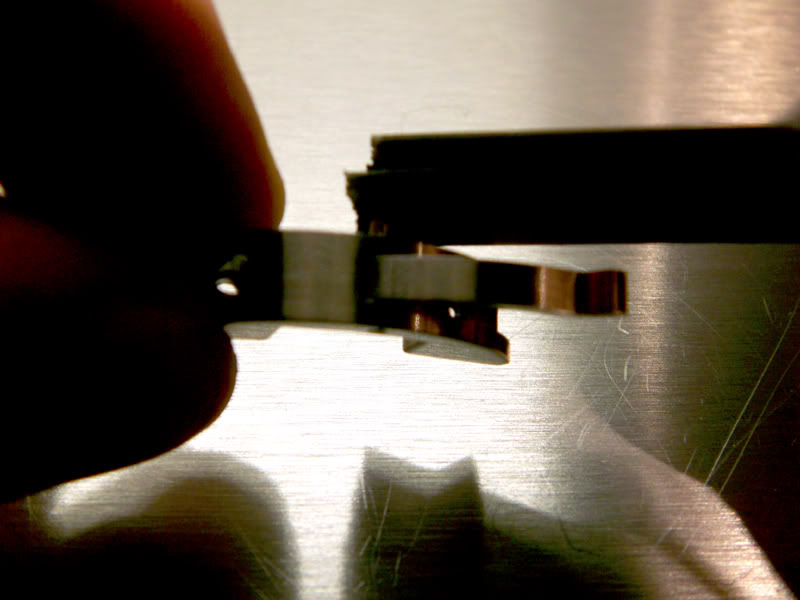
4. The intermediate wheel shown above may sit higher than the rest of the back plate. If this is the case, carefully remove the set bridge (if you don’t know how to do this, you shouldn’t be attempting this project!) and the intermediate wheel will be free. It looks very similar to a clutch at the moment, and will essentially need to be cut in half to allow a dial to fit this movement.
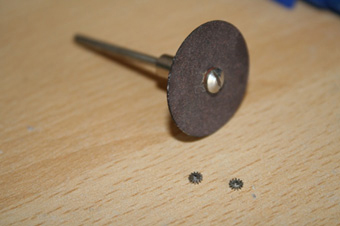
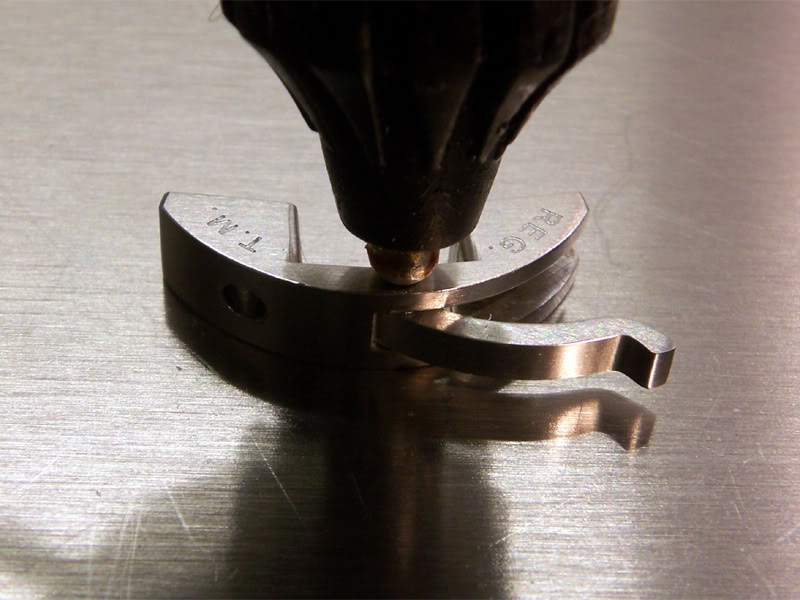
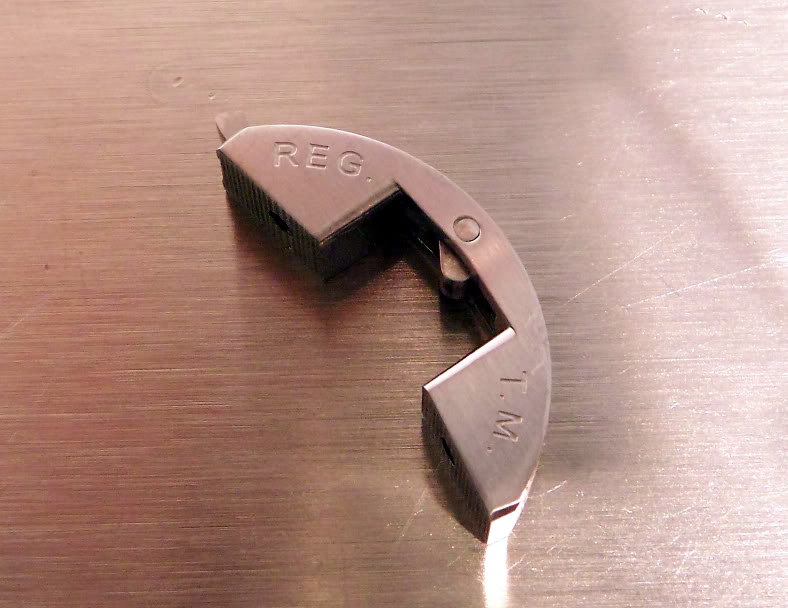
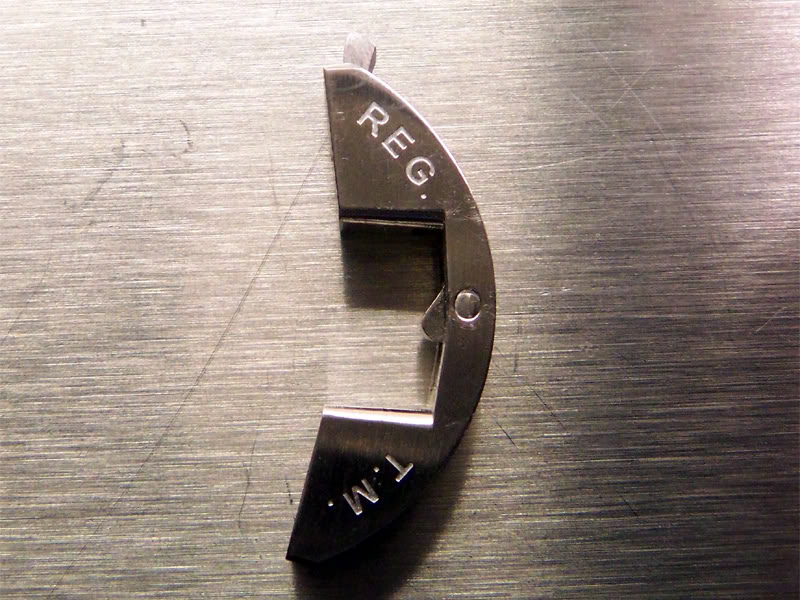
This is the wheel cut in half. To do this, it is best to thread a wire through the centre to ensure you don’t lose any parts, carefully clamp the side of the wheel that was exposed on the back of the movement, and slowly work around it with a very fine dremel cutting disk. You will then need to carefully file and sand the wheel flat, and thoroughly clean the wheel and store for later.
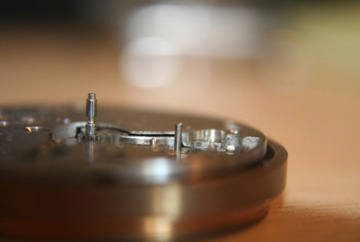
5. The pinion that held the intermediate wheel will also be sitting proud of the movement. This needs to be shortened. To do this, carefully tape the movement to a desk top using low tack masking tape. Allow this pinion (and possibly the canon pinion) to protrude through the masking tape. Ensure there are no gaps in the tape, as you don’t want metal filings in your movement.
Slowly file this pinion down using a needle file. Ensure it is filed to just below the height of the backplate. Carefully bevel the edge of this pinion so that the intermediate wheel can be relocated onto it.
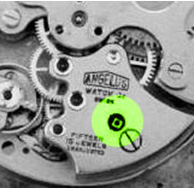
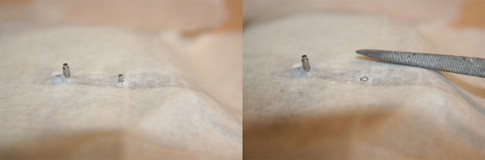
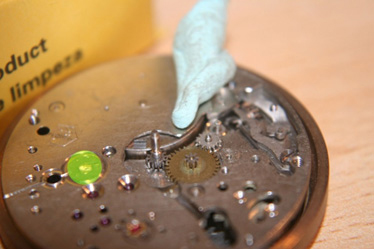
Dust off all filings and carefully remove the masking tape. Now use Rodico to clean up the keyless works and any other area of the movement. Note the brass pivot highlighted in green. This is a pivot for a calendar transfer gear, and is no longer required.
6. Once the movement is covered in low tack masking tape again (other than the pivot), slowly file with a flat needle file. Once it is flush with the plate, use 600 grit paper to tidy the movement up. Dust away any filings, and use rodico to clean the area before removing the tape.
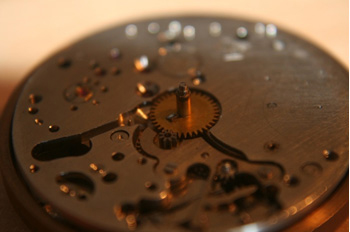
7. Put the intermediate wheel back in place, and reassemble the keyless works. The back of the movement is nearly ready for a dial; the only part that sits proud is the small tab on the hour wheel and the extra tall minute wheel. If your movement has these features, they will also need to be filed down.
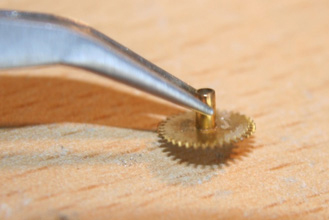
Remove the hour wheel. Using a needle file, slowly file down the brass tab. Be careful to to damage any teeth on the hour wheel or the brass tube. Once flush with the main gear, use 600 grit paper to leave a smooth and tidy finish.
File down the back of the minute wheel until it sits below the backplate. Do this in steps, and be sure keep checking how much filing is left to do. Keep the filing perfectly horizontal, and once it’s at the right height, use a small needle file / grit paper to clean up the teeth.
8. Now that the back of the movement is ready, reassemble everything, give one last clean with Rodico and check that everything is running as expected.
9. You will now need a dial. The subdial spacing is 8.9mm from the centre. If you would like to install a second hand, you will need a standard Panerai style second hand with an extra long tube.
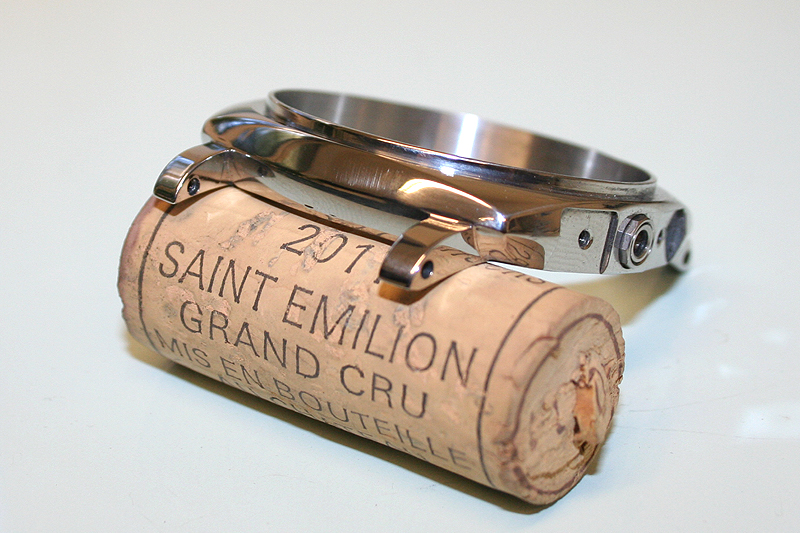
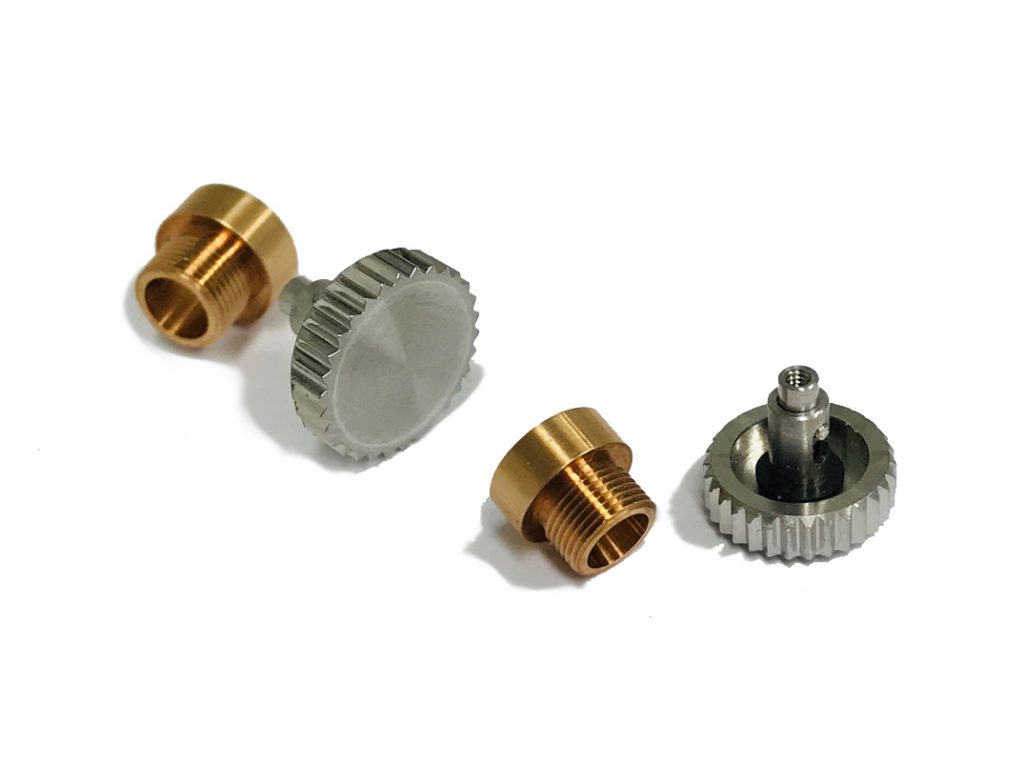
You also need to find a case, custom made movement ring for an Angelus 240, plus a Crown and you’re ready to go. Here are the parts used for this project:
10. If you’ve gone to this much hassle, you may as well reshape the case to get a perfect finish. This tutorial will not cover that, but lots of filing, sanding and polishing are required!
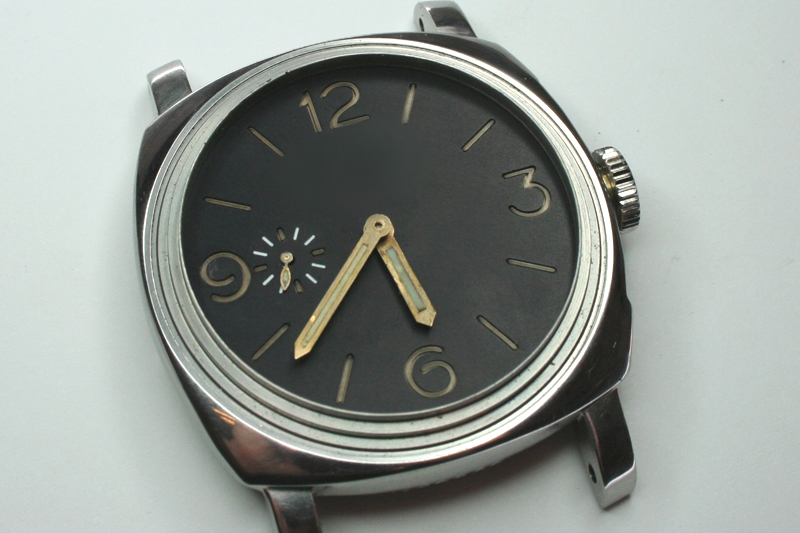
11. You may want to lume the hands if required. I have developed a technique to create coloured, cracked hands to match the vintage style. To achieve this lightly cracked finish, mix white lume powder with a small amount of water colour (your choice of colour!) and a small amount of acrylic varnish / water to get a thicker consistency. When the hands are lumed, the thicker liquid will hold the lume together whilst the pigment tries to contract and dry – this cracks the hands and looks identical to a 1950’s watch!
12. The final step is to case the watch. You must find a combination of a case / dial that allows the stem to align correctly with the crown tube.
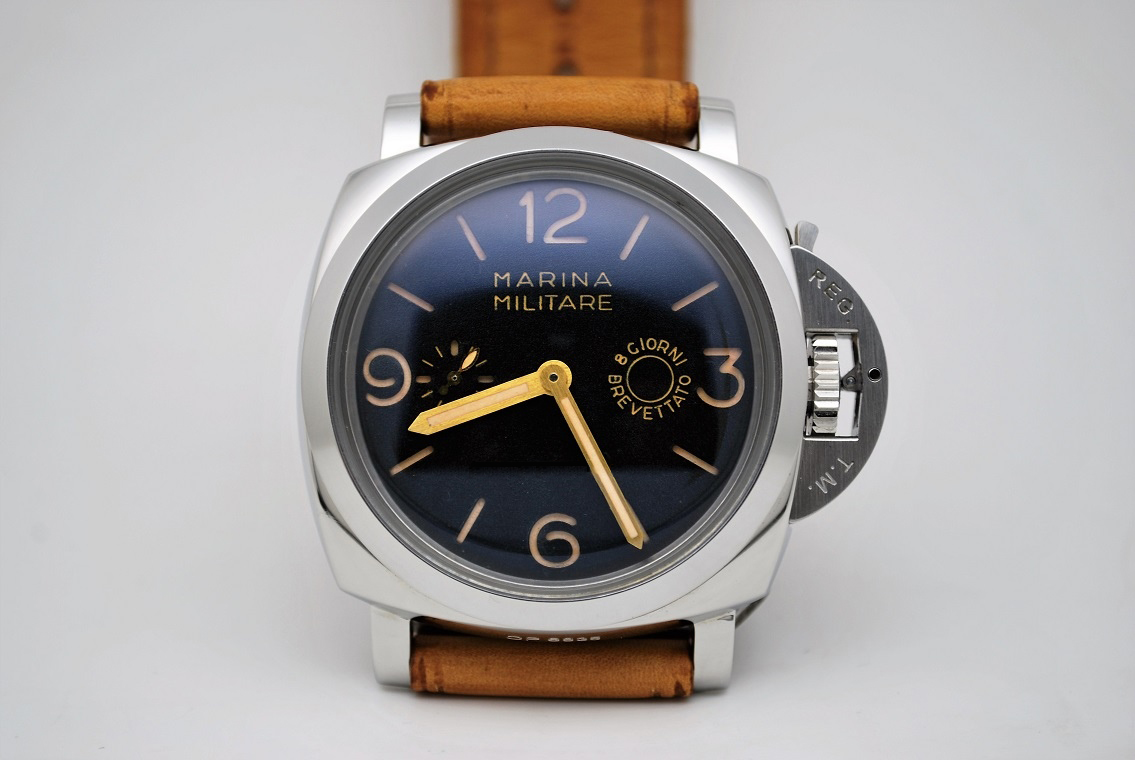
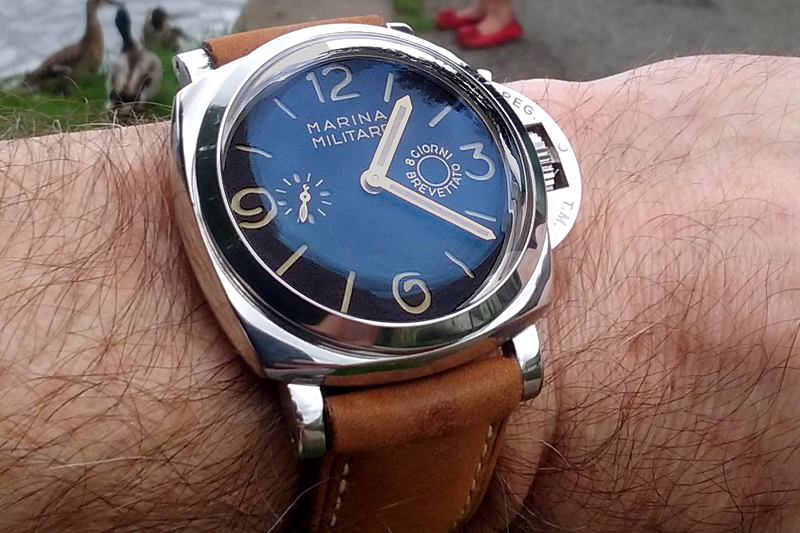
The image above shows a genuine Panerai 372, this design was based on the Vintage Panerai, its a combination of old and new.
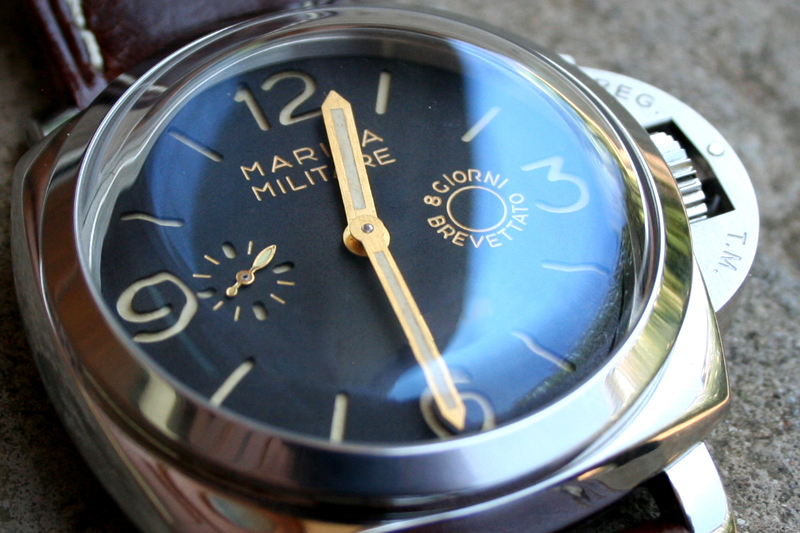
Adding an Angelus 240 cal with a 2mm thick 3 Piece Dial will not fit inside the watch case without modifications. There are two problems, a) the 8 day Angelus 240 cal movements is fairly thick and the dial by watch standards is very thick indeed. In short the dial and movement are far too thick for the watch case.
Why use such a thick dial if its going to be difficult to fit? This is one of the main differences between a Modern build using Modern Type Parts and a Modern Build using Vintage Type Parts. The 3 Piece (2mm thick) dial is very similar to what Panerai used 50 years ago. Whilst it is problematic to fit it is however, special as it has so many of the old characteristics that can only be found in a Vintage Panerai Dial.
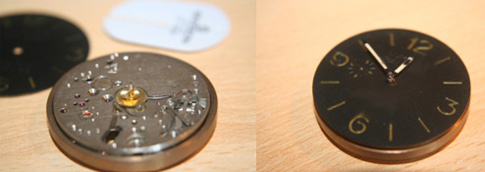
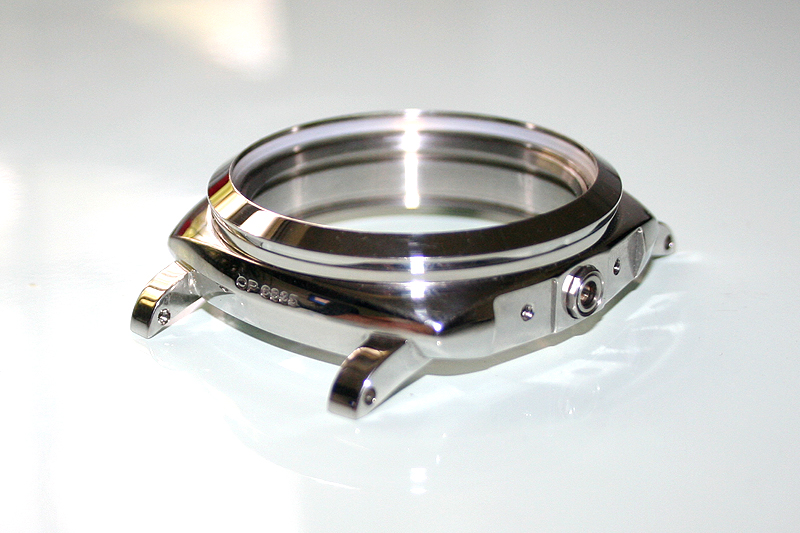
Above: The start of the very first MV watch. This was to be a prototype case to see how to solve the problem of fitting an Angelus with thick dial into a small space. The first case was not a success and was destroyed when it was machined too much on the inside. The second was an improvement, the third a success and the four had the final modifications.
Above: Trying to solve the problem with fitting the 240 cal with thick dial into the Case. Three areas have to be very accurate, the overall depth, the alignment of the stem and stem tube and the total height so that the Case Back screws into place and holds everything together. Get one of these wrong and the project will fail.
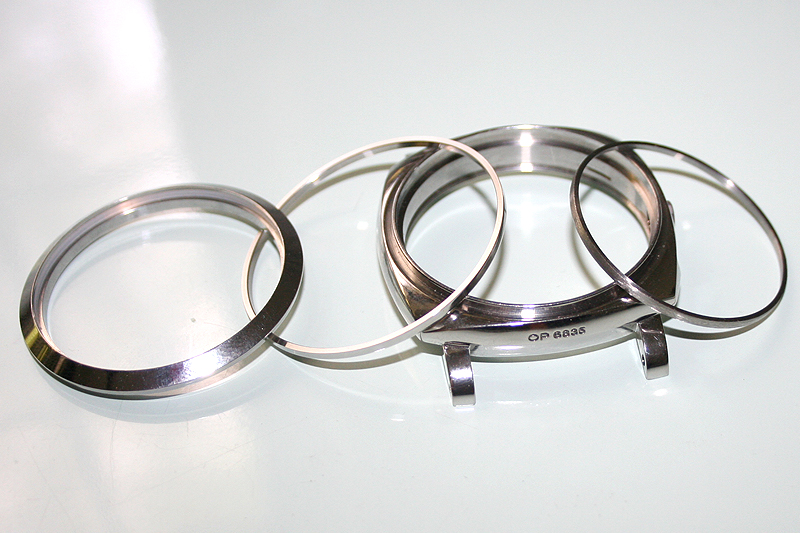
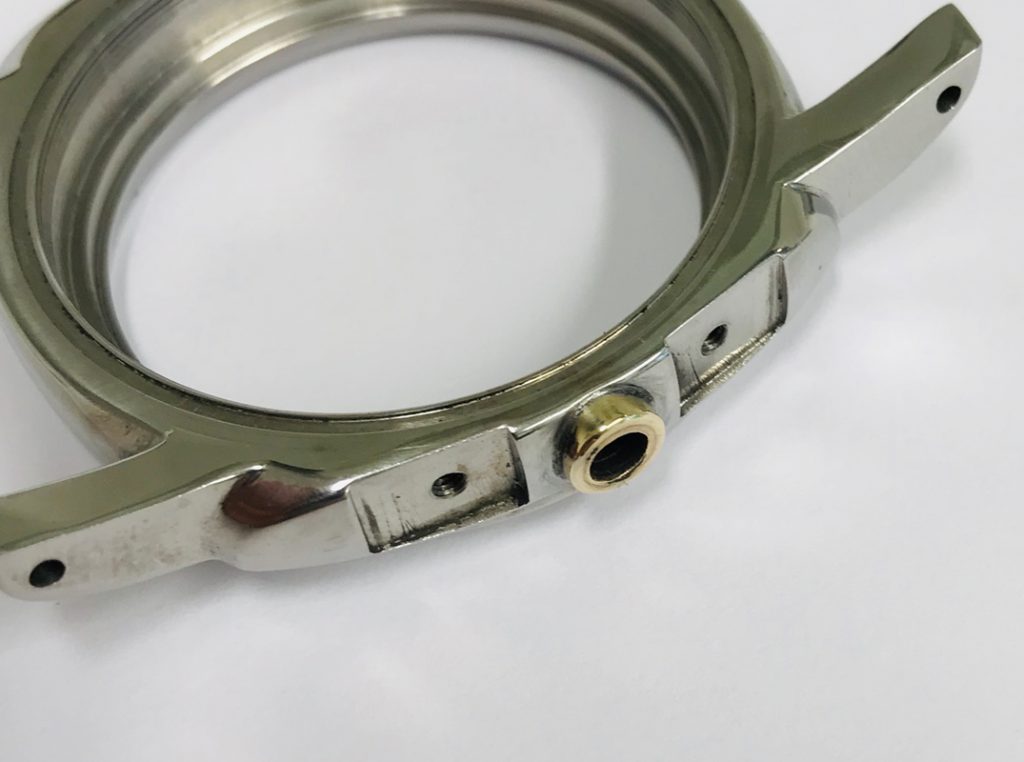
Above: The solution was to make a new bezel, outer spacer ring, inner spacer ring and also machine the inside of the case.
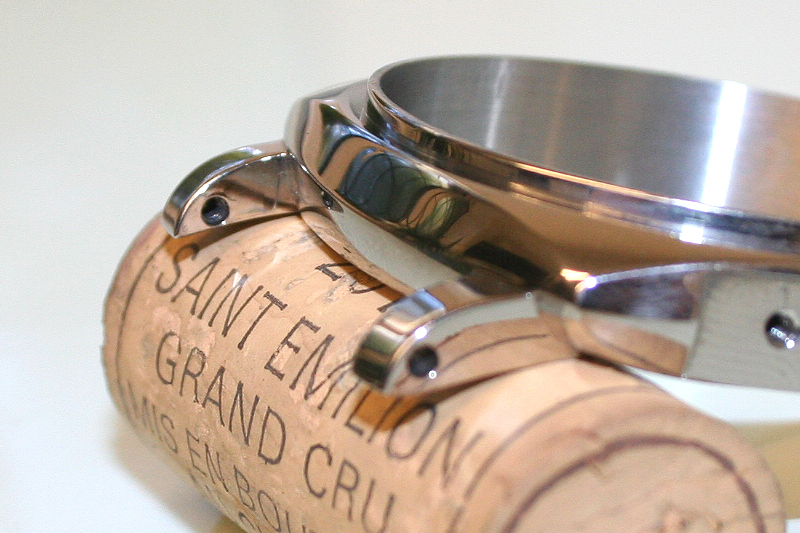
Above: This was the case that was selected to have the engraving removed. Its not easy as the depth of engraving is quite deep. In removing the engraving its easy to lose the shape of the case. One case was destroyed when the shaping failed. Above is the second and successfully shaped case.
Above: unfortunately there are two sides to do and its a slow process, all hand work.
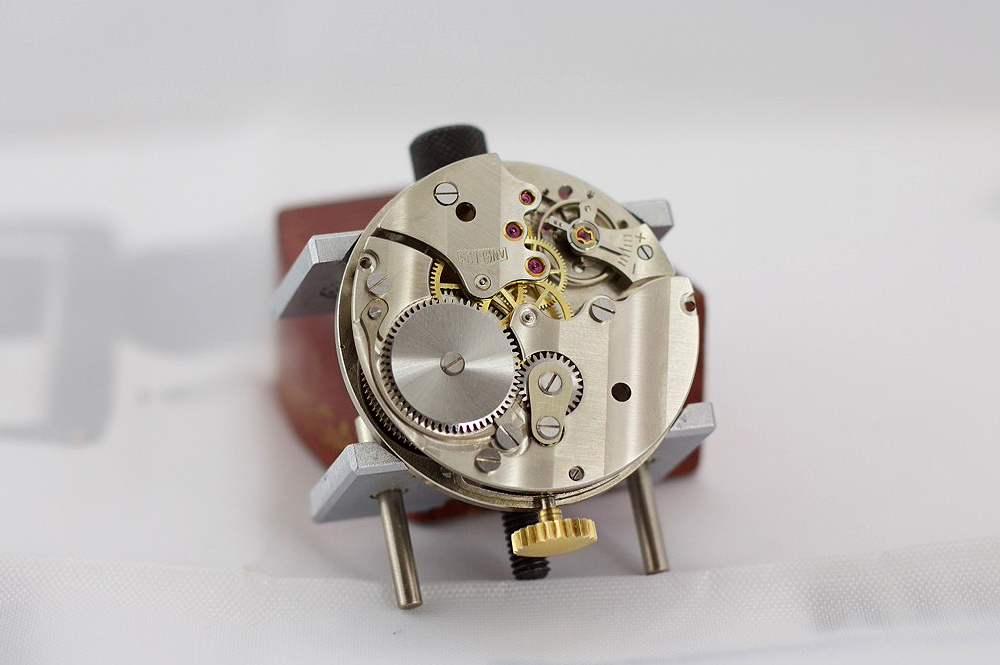
Above: The Angelus Movement before and after the Plate Conversion.
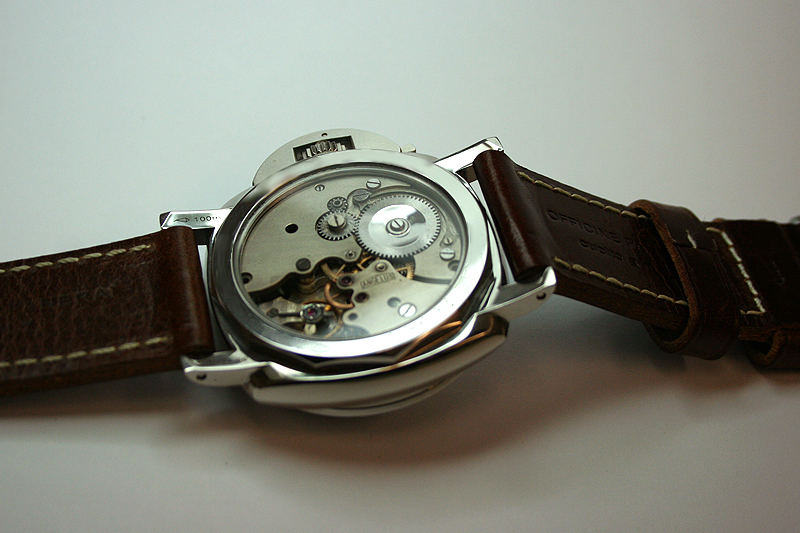
Above: The movement is a little low inside the holder, the holder was modified so that the top surface is flush with the movement. This movement was fully stripped, deep cleaned and polished then rebuilt by a master watchsmith. Its amazingly accurate for its age, + or – a few seconds a day (good for this type of movement).
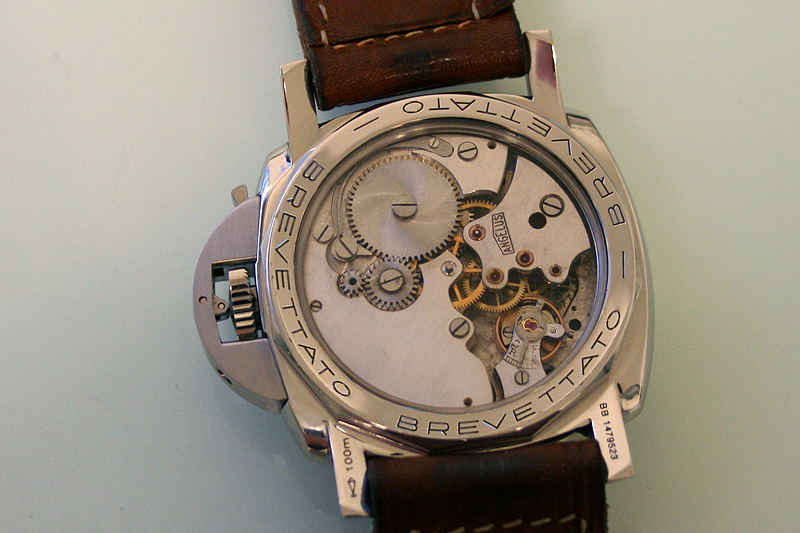
Above: Everything is in place, a sapphire crystal has been added, so there just one last thing to do and thats to upgrade the strap above to an authentic Panerai calf skin strap.
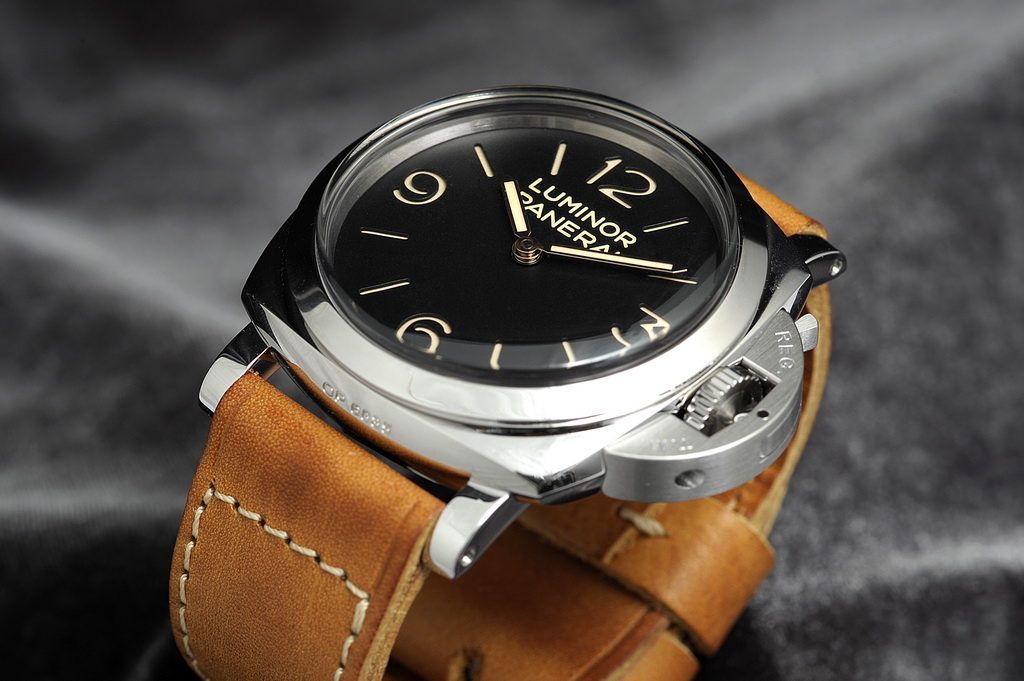
Above: Two types of Bridge Plates were used on the three watches. Two watches didn’t have CDG (cotes de geneve) and one had full CDG. The watch in the image above is without CDG (similar to the 203 which didn’t have CDG)
What movement should I use? Once you have decided on which Case you plan to use you then need to consider what movement you would like to add. Its a good idea to select a movement that is going to be compatible with the Case and Parts you will use in your project. For example you make decide to use an usual movement only to find that none of the upgrade parts are compatible. Here are a list of compatible movements.
Unitas 6497
Molinja 3601/2
Cortebert 616
Angelus 240 cal
Rolex 618
The next step is to decide how much you want to pay.
Asian 6497: The lowest price is likely to be an Asian 6497. A good Asian Movement from a good supplier is likely to be a very reliable movement. Prices vary from $40 to $60
What to watch for: Some 6497 are being sold without oil. These are probably from a large consignment that were supposed to be used in a factory and the factory was planning to oil then check the QC. Most Asian movements are very good ask the supplier whether the movement has been oiled and passed QC
Molnija 3601/3601: Prices vary widely. In 2010 the 3602 could be easily bought for $28. Because so many people are using this movement for projects the the price can be as high as $100 and more. The Cannon Pinions on the 3601 and 3602 are quite short however the 3602 does have a slightly taller Cannon Pinion and has a jewel center wheel bearing (visible in the center of the movement on the backside). Many people prefer a brass center wheel bearing on the 3601 as its similar to the Vintage Panerai movement).
What to Watch For: excess old poured into the keyless system. Its very common to see some of these movements almost flooded with standard oil thats been poured into the keyless system. Also look for excessive wear and “wobble” on the balance wheel. Unfortunately many have not been properly serviced over the years, always ask the seller how accurate it is for example Plus or Minus (+ or-) how many minutes/seconds per day. If the seller wont say then be careful (its easy to check just wind it up and see how it runs over 24 hours).
Cortbert 616: Cortebert sold the machine tooling to Molinja Russia when they closed the Coretbert Swiss Factory. There is no doubt when compared to the Russian Molnija that the Coretbert is a better movement. Not all Cortebert are perfect but most seem to run well, I have seen fewer problems with the Cortebert than I have with the Molinja. Maybe this is because people serviced the Cortebert more often. Prices for the Cortebert have been fairly stable over the years expect to pay around $350 to $400
Angelus 240 cal: This is an 8 day travel clock movement that was once used by Panerai around 1961, this movement came without and alarm and is stamped Juni 61. Most Angelus 240 that are for sale will not be quite the same as the Panerai version. They will either have an alarm system or will have the alarm function removed and sometimes the Bridges converted to look like the authentic Vintage Panerai,s often many look very good.
There are many points to look for on the 240 cal but you need to be aware whether the movements is Incablo or Non-Incablo. Incabloc is shock protection and suitable to use as a watch. Do not be put off buying Non-Incabloc, they are fine, just don’t wear the watch if you plan to chop wood with an axe (if you know what I mean).
Things to check on the Angelus 240:
Is the movement keyless or do you need a key to wind it (not suitable)
Is it Incabloc or Non-Incabloc (look at the balance wheel adjuster)
Is the Hour Wheel over 3.25 tall (spare wheels are available)
When was it last serviced
Is it accurate to + or – 2 to 3 minutes a day
Has it been converted to fit inside a watch (see how to convert on this website)
Are conversion plates fitted (some will have the bridge pillars turned down).
Price for the Angelus vary widely from $800 for a on Incabloc unserviced to $2300/$2400 for something thats had a lot of conversion work, servicing etc. If you can find a 240 cal with the original plates then prices can be even higher. The most expensive would be the genuine Juni61 (June 1961) movements, these are rare and will be the most expensive.
Rolex 618: As this movement was used by Panerai then often the movements will not need any conversion parts. The true 618s as used in the Panerai are very rare and batch numbered. However, you may find a nice Rolex pocket watch with a 618 inside that would make an ideal movement for your project. For the pocket watch type movement expect to pay $2800 to $3000
Basic Rule: Ask when the movement was last serviced, if the seller doesn’t know then assume it hasn’t been serviced. A good clean and service will cost around $100. However a skilled watchsmith can often take a movement with say + or – 2mins lost or gain a day and tune it to a few seconds a day. Not many watchsmiths can do this so its worth asking around and expect to pay around $200 for his time (its often worth it if you plan to keep it). Always ask how accurate the watch is and dont assume because its cheap it will be a bargain.
There also a great step-by-step tutorial just above this post. To find it, go to “6152 Project” at the top of this page and look for the drop-down box. There are over 80 images that take you through every stage.
Lets start building the 6152. You are going to need a movement and a 6152 Case. Decide carefully which movement to use as not all movements will fit the case or be compatible with the upgrade parts.
Here is a list of popular movements
Unitas 6497
Molinja 3601/2
Cortebert 616
Angelus 240 cal
Rolex 618
6152 Case: You can buy a 6152 case ready completed (upgraded as a Vintage) or you can buy a basic case from a supplier which is usually a modern case that will need converting into a vintage. Again be careful which case manufacturer you use because not all cases manufacturers use the same sizes and threads. Many people have bought a case only to find that none of the parts available for upgrade will fit.
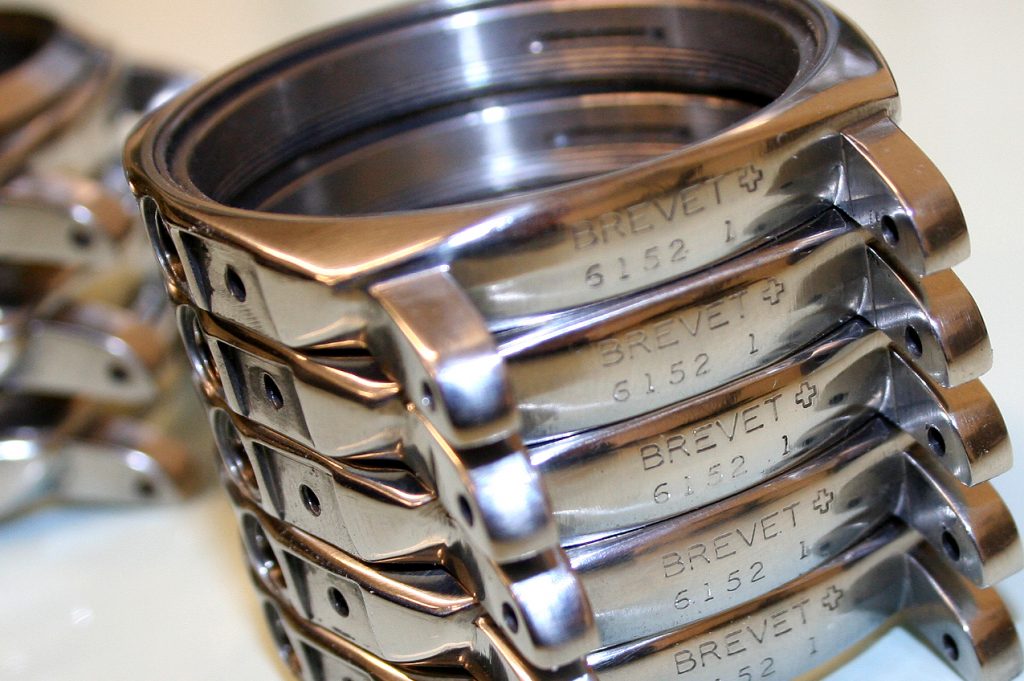
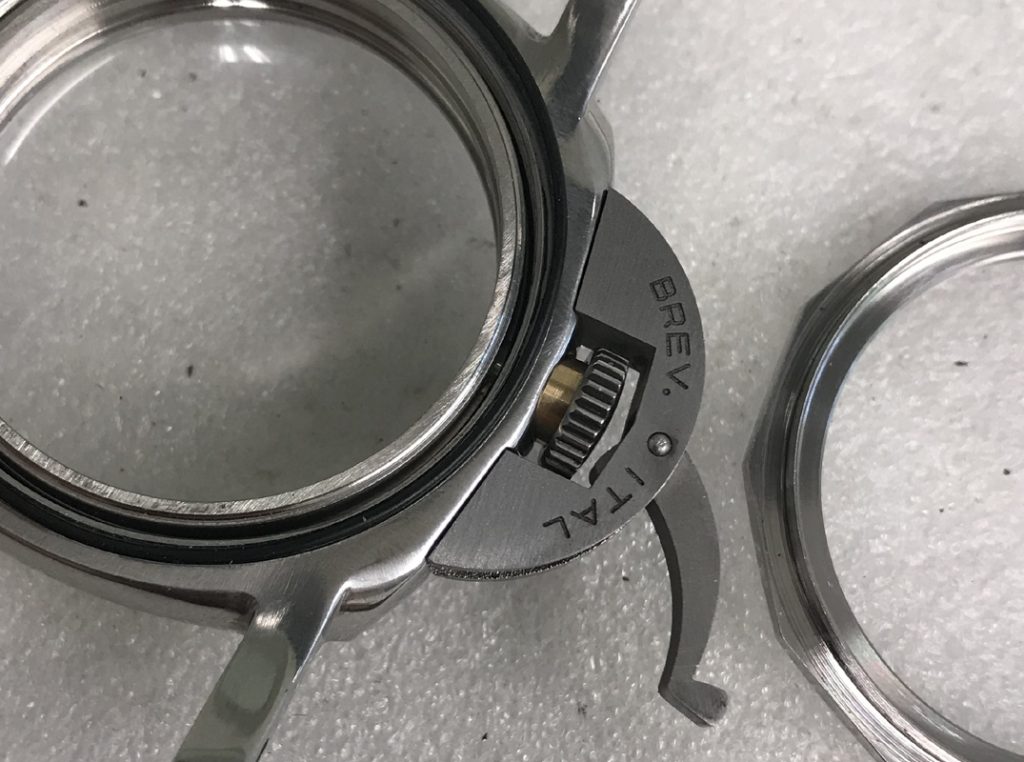
Below: You will see a 6152 Case that has been partially upgraded ready to be used in a project. Factory 6152 Cases do not come engraved between the lugs, this is an important detail. The correct way to engrave is to engrave by hand on a Pantograph Machine, this is how the Vintage Panerai 6152 cases was engraved. This is a traditional way of engraving, unlike CNC it relies on the skills of the operator. The 6152 is not an easy case to engrave as the area between the lugs curves in all directions. What this means is that the engraver is constantly controlling and adjusting the height of the cutting tool as it passes over the curved surface of the case. Its not easy, it takes a skilled engraver to cut the text you see below.
All serial numbers start with “124” and serial numbers are six numbers long, the opposite side of the case says the words “Brev Ital”
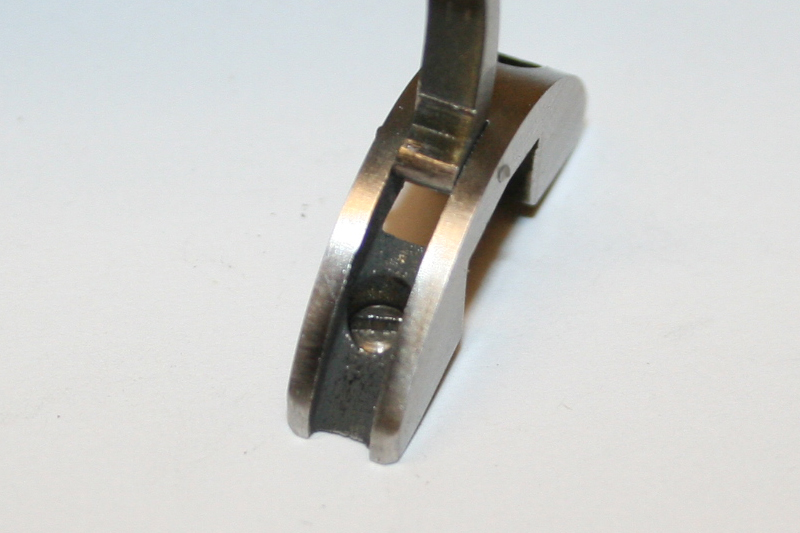
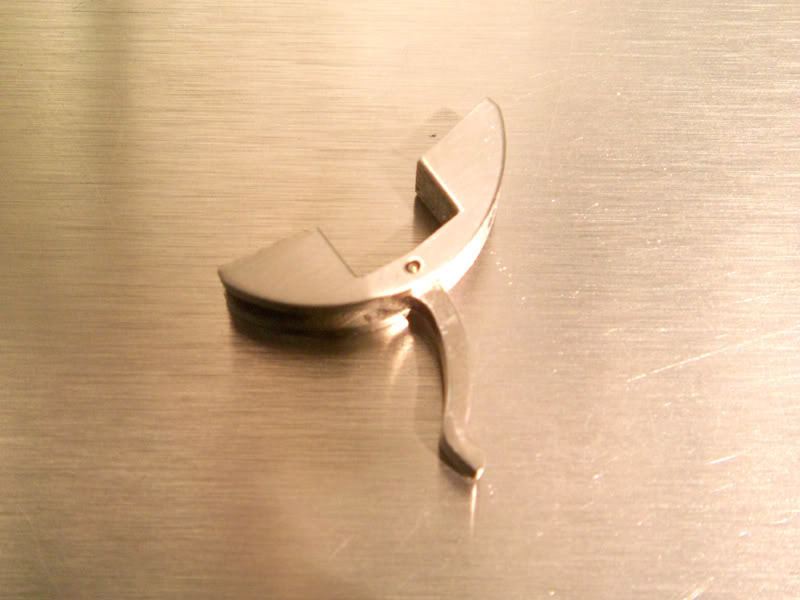
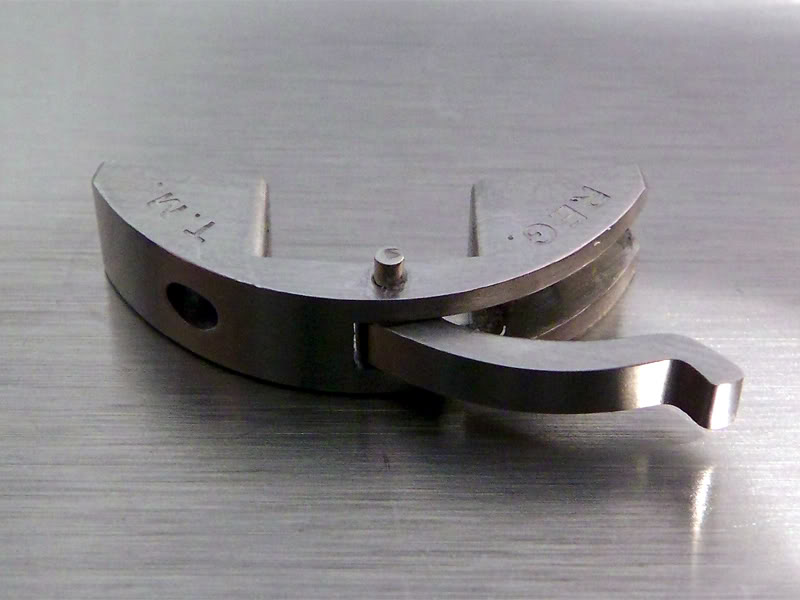
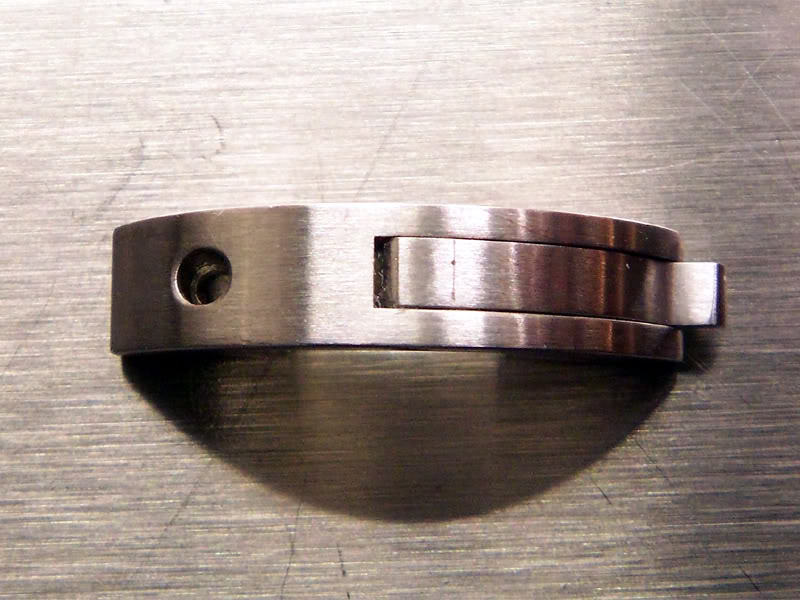
Lets look at the Crown Guard. Again this is an important feature, it will need to be filed and shaped on the outside (shown below) and also on the lever. Its important to file the lever to the exact size, so that when it closes it isn’t too loose or too tight. Also note how the lever almost touches the side of the case when closed.
Below: shows how the top of the Crown Guard has been filed and shaped by hand. The authentic Vintage Panerai Crown Guards were hand finished the same way.
Below: This Crown Guard will be fitted to the 6152 Case with 2mm screws. Factory cases are usually around 1.4mm, the problem with screws as small as this is that the threads can easy break especially if the Crown Guard Lever applies too much pressure on the Crown. Genuine Vintage Panerai screws were 2mm.
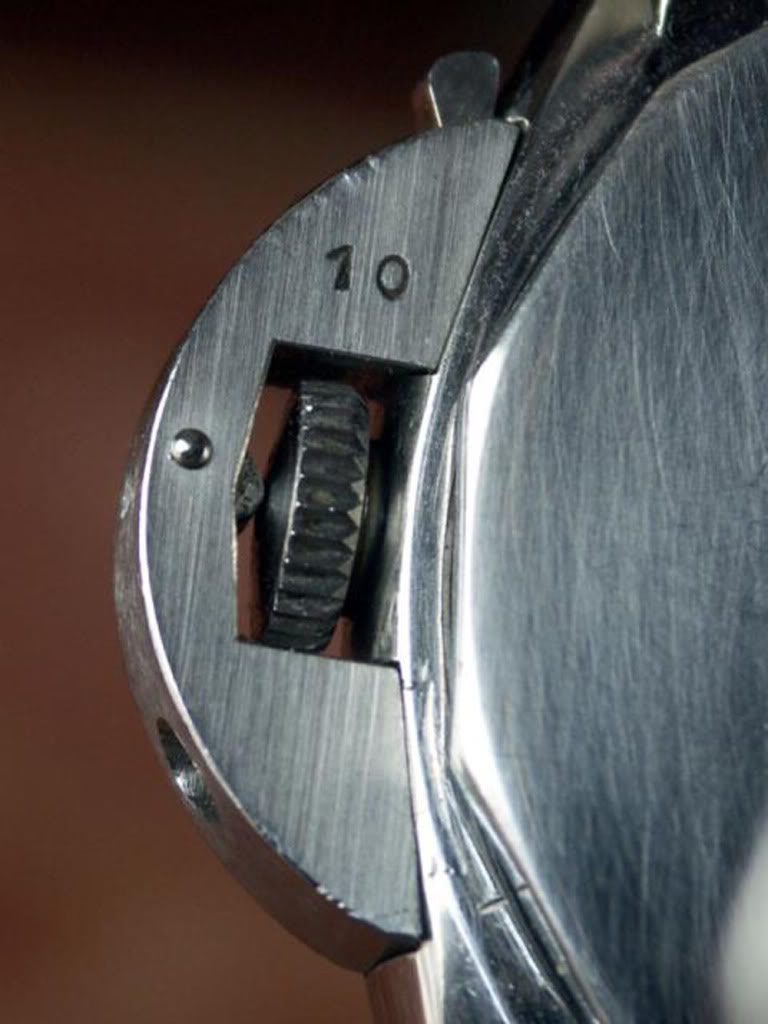
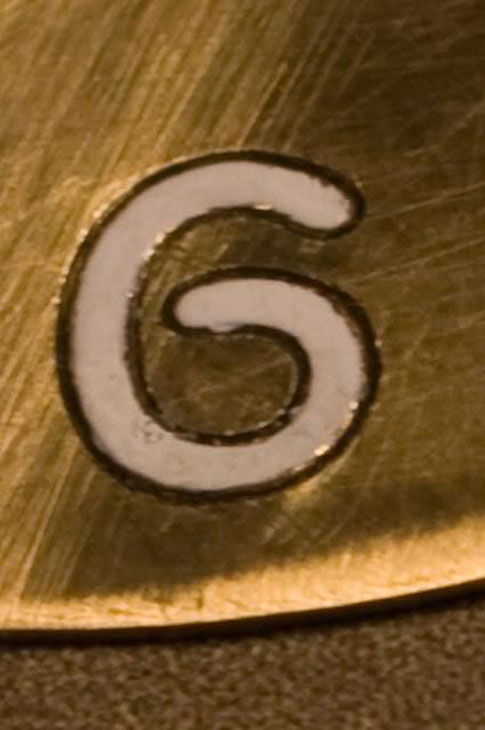
Below shows the most common Vintage 6152 Crown Guard note that is isn’t engraved with “Brev Ital”. The number 10 is shown below but other numbers were used like “7” “5” “3” etc. The number “10” is usually found at the Top Rearof the case (as shown in th image below). Numbers “7” “3” etc are usually found stamped on the Bottom Rear of the case. Which way round? Numbers were mainly stamped so that the font faces towards the Crown (as shown in the image below).
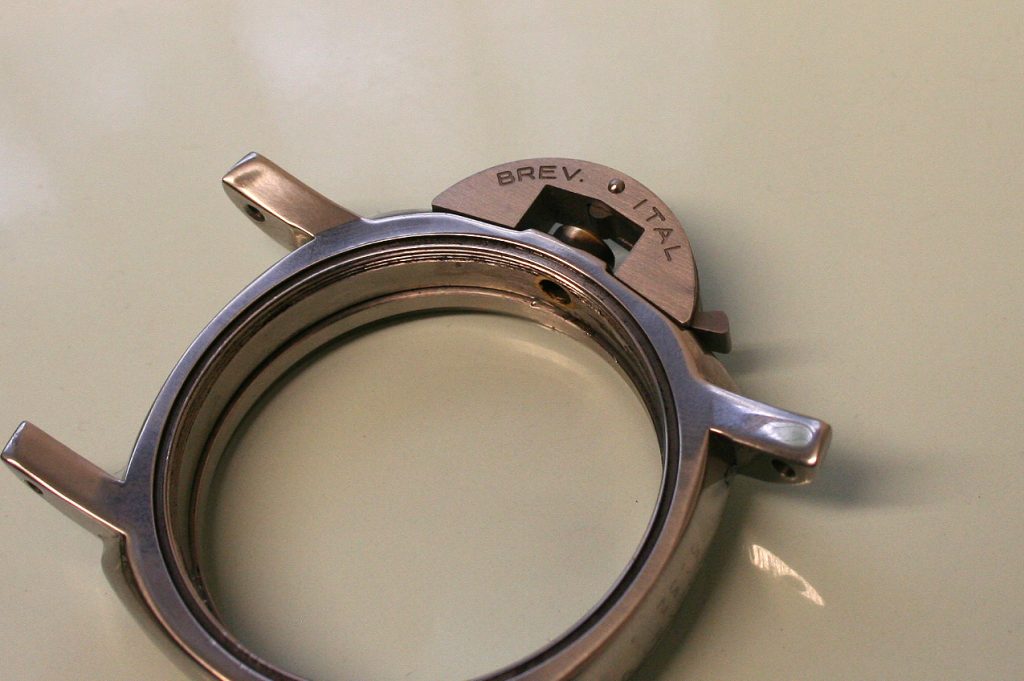
Below shows an engraved Crown Guard with the text “Brev Ital” this was only added to later Panerai 6152 Crown Guards and is less common.
The next stage is to decide what type of dial to use. You can either use a thin dial around 1.2mm thick or a more accurate dial of around 2mm thick. The true size (thickness of the authentic dial is shown in another article on this website, not all Vintage Panerai dials were 2mm thick).
Thick Dial: If you plan to use a thicker 2mm dial then you may need to change the bezel to a 2 Piece Bezel. The alternative to this is to use one of the New 6152 Cases that is shown on this website, the New Case is available mid to late summer 2017. The accurate Dial Diameter should be 37mm.
Alternatively you could also use a thinner dial of around 1.2mm thick. They are not quite as accurate and you will not need to upgrade the bezel as they should fit inside most 6152 cases. The diameter of the thinner dials are usually 39mm.
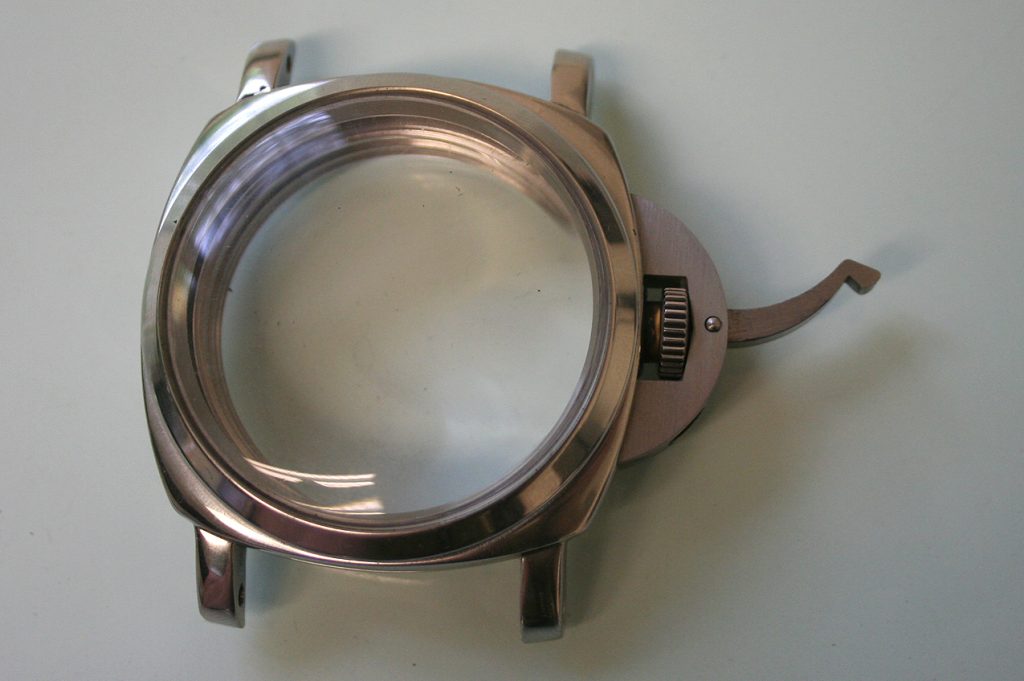
Below shows a 37mm / 2mm (thick) dial being fitted into a 6152 Case. The Case is shown without the Outer Bezel so that you can see the Inner Bezel which has been special made for this case.
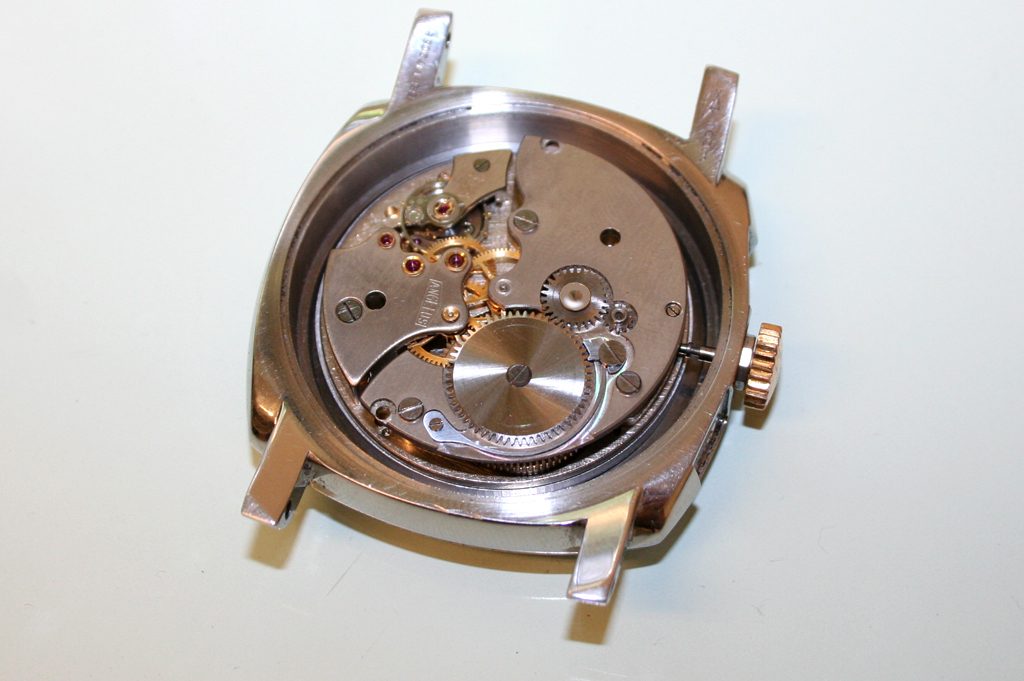
At some stage you will need to decide what Movement you plan to use. Below shows an Angelus 240 cal with Stainless Steel movement holder.
Before the movement can be inserted into the case and checked for alignment we need to fit the Stem Tube. Below a new Bronze Stem Tube is shown (authentic Panerai 6152’s used bronze not brass). The Stem Tube will be aged before fitted, if you dont know how to make this part look old then ask the supplier on this website as they will offer to age it for free.
Below: The Stem Tube, Crown, Crown Guard and Plexi have all been fitted. Its now time to fit the movement.
Below: If you look at the movement inside the case you will see that the Movement Holder hasn’t been fitted yet. At this stage its a good idea to check to make sure that the stem aligns perfect in the stem tube.
If everything aligns and works well then its time to finish off the project and screw the Case Back on.
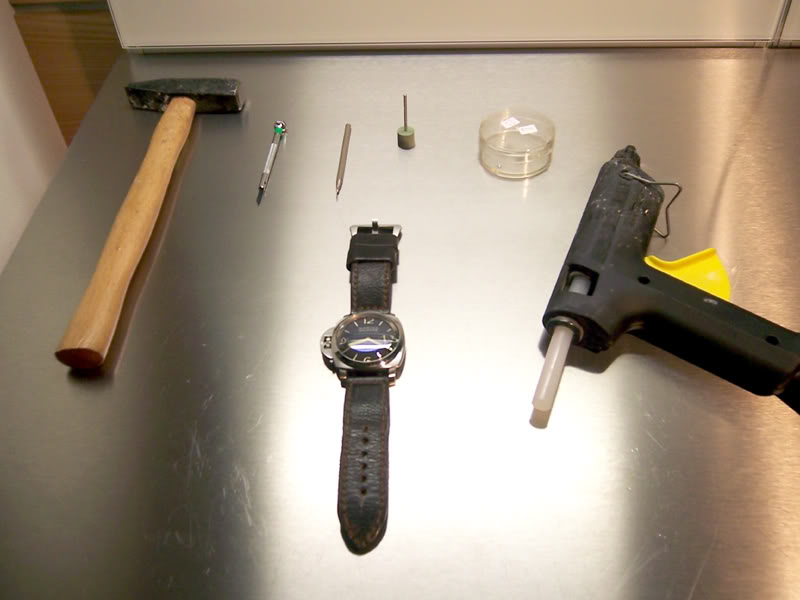
How to tighten a loose Crown Guard Author: Thanks to Watchman for this shared tutorial
This is what you will need: * a screw driver to loosen the crown screws * a pin removal tool or small drill to remove the pin * a small hammer * a Hot Glue gun
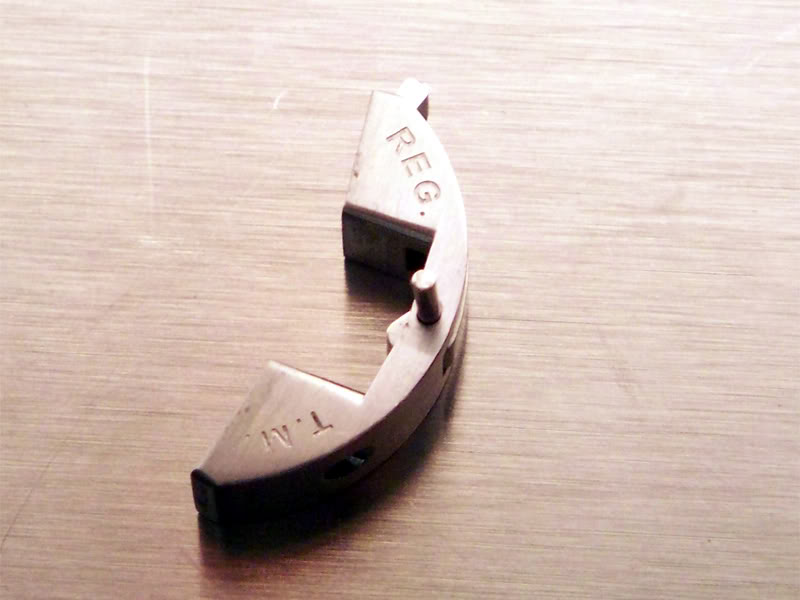
Step one: Fire up the glue gun. Step two: Detach crown guard from your pam and safely store the screws away.
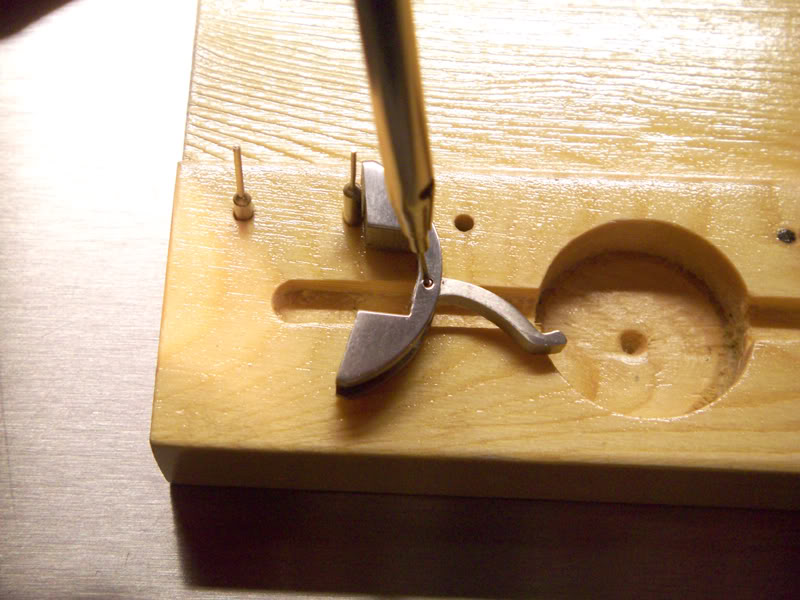
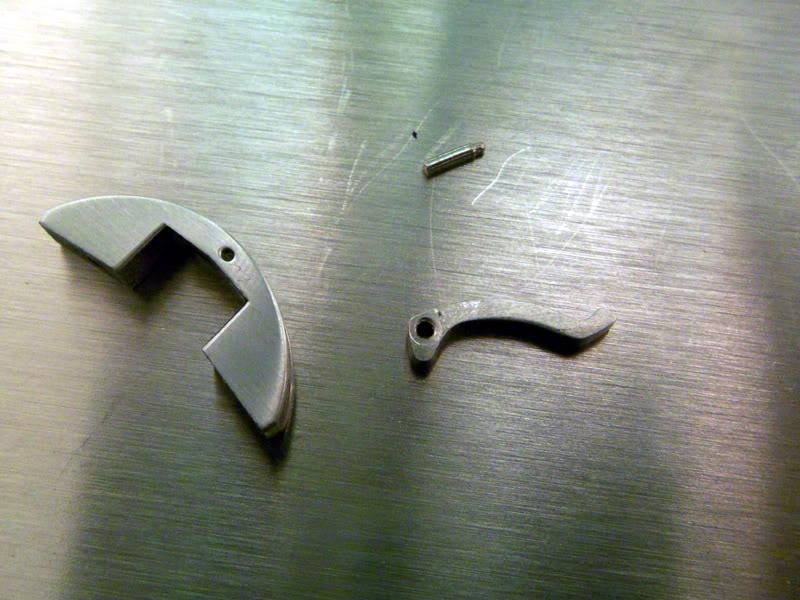
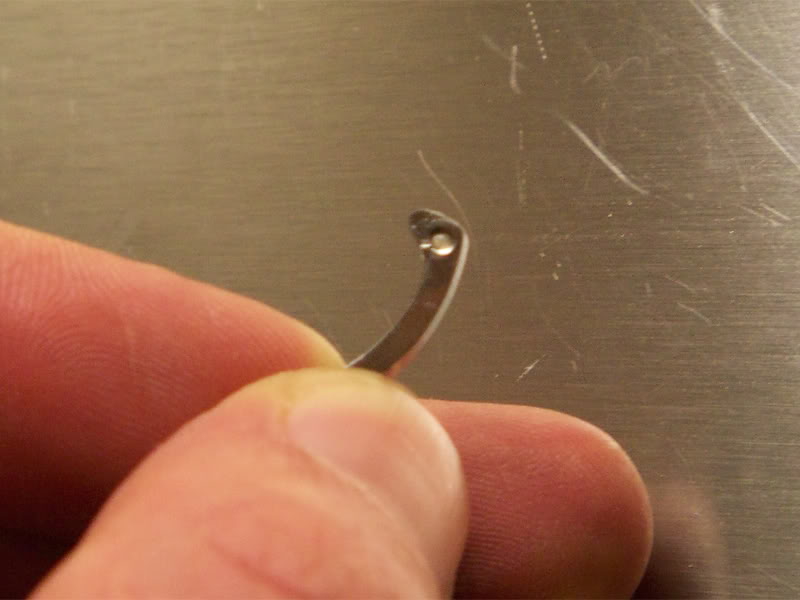
Step three: Put the crownguard bottom up on a piece of soft wood. Use the pin removal tool or small drill to dislodge the pin from the crown guard. Be careful not to loose it once you pushed it out.
The result should look like this. Here you can see clearly that the pin is much smaller than the hole in the lever. That is why it is so loose in the first place.
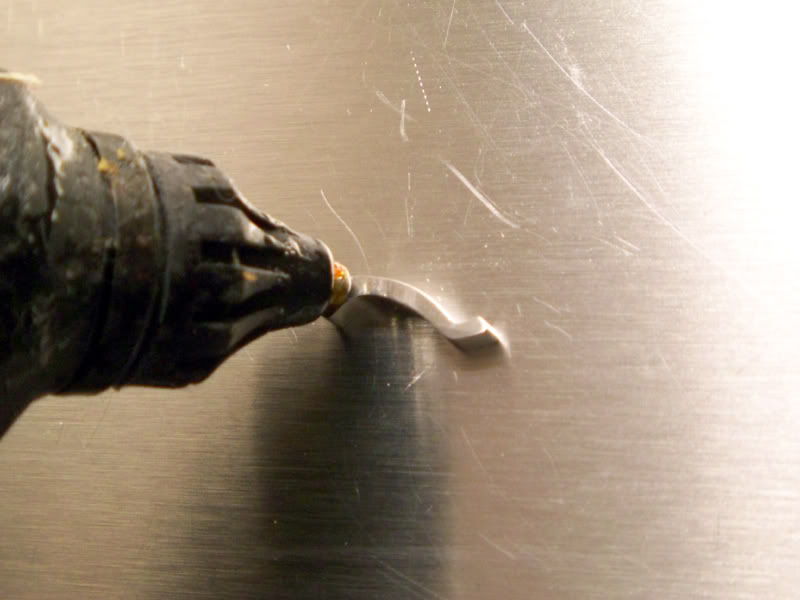
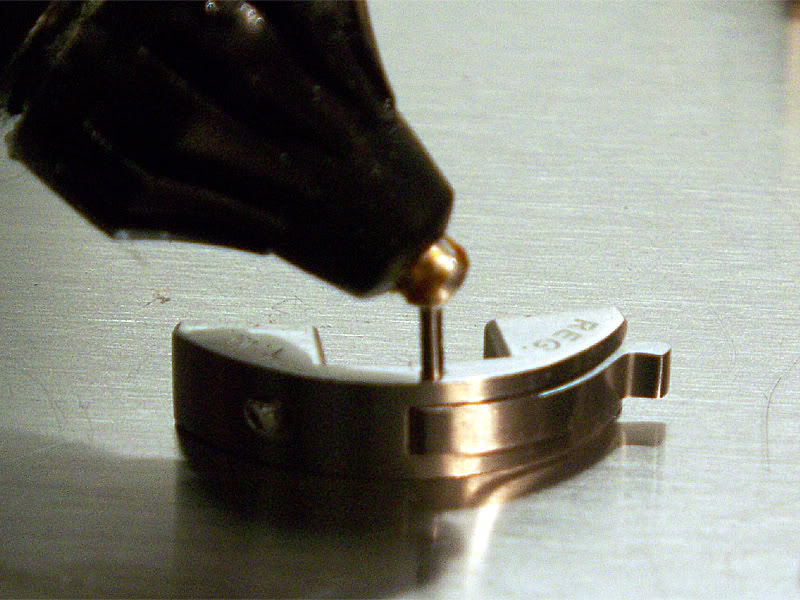
Step four: Place the lever on a table. The hole for the pin needs to be vertical. Then place the tip of the glue pistol on top of the lever without (do not dispense any glue yet). Now the lever is slowly heated up by the metal tip of the glue gun.
Step five: Once the lever is really hot apply glue to the pin hole in the lever until it comes out on the opposite side of the lever. Then let the lever cool for 5 minutes or rinse under cold water.
Step six: Remove excess glue, your fingernails should do the trick. Step seven: Place the lever back in the crown guard and reinsert the pin just a tiny bit (1mm).
Step eight: Put the glue pistol on top of the pin and wait until it picks up the heat. After a while, it will just sink into the crownguard until it is all the way through the lever.
Stop pushing when the pin is still sticking out 2mm.
Step nine (optional): If you want the pin to sit flush with the surface of the crownguard, now is a good moment to file or sand the top of the pin to a smooth flat finish.
Flat surface after filing and sanding. You can also leave the pin sticking out just a hint and wetsand the top of the whole crown guard complete with the pin. This way you will get a perfect surface of crown guard and pin. I would have a look a the gen first, to decide which way to go.
Step ten: Place the tip of the glue pistol over the pin and heat up both pin and crownguard. This takes a minute or two.
Step eleven: Gently push the pin down. If you want it to sit flush with the surface a hard piece of wood will do. If the pin is supposed to be sunken, the pin removal tool or small drill will do.
Step twelve: Again remove excess glue with your fingernails or with some solvent.
Step thirteen: Re-attach the crown guard to the watch and enjoy the firm and tight lever.
The best thing for last. Should the lever ever become loose again (though I expect the glue to outlast any silicone), just use the glue pistol again to reheat the lever. You don’t need to disassemble the crown guard this time around. Just press the pistol on the crown-guard for 2 minutes. The glue will melt again and settle tightly around the pin. Once it has cooled off, it will be as good as the first time around. You can repeat this indefinitely, one application should last the lifetime of the watch.
Luminous pigment when mixed ready to use is very peculiar stuff with some strange characteristics, so expect to take a while to master the basics of working with it. If you’re really determined to try for yourself,
DO NOT THINK OF STARTING IMMEDIATELY ON A REAL DIAL! PRACTICE, PRACTICE, PRACTICE.
As most of us don’t have a box of old dials lying around, get something like thin sheet brass, cut out a few dial size circles, paint them black and then use them to practice on. Just keep cleaning them back to metal with thinners and doing it over again.
As SuperLuminova is VERY expensive to use for practice pieces, I’d suggest starting with some of the inexpensive pigment from someone like Glow Inc. (or if you’re in the EU you can get similar pigments from RRWP or SatinTime). Start with the easiest to use, small grain particle pigment, that’s the V10 5-15 micron that costs just over $20 an ounce from Glow Inc.(that’s loads in watch quantities). Then you could start with some artists acrylic painting medium from your local craft store to use as the binder or any good clear art varnish that has no UV filtering. But the binder characteristics is possibly the main thing you need to learn, so do try to get a proper one (A100 from Tritec or Binder 3 from Noctilumina are good general purpose ones), along with the matching thinner/dilutor. By all means get some C3 or G8UF while ordering the binder, just don’t waste it on practice pieces unless you have money to burn. Expect to redo the dummy dials a good few times before you get a feel for it and are anywhere near ready to try a proper dial. Just practice doing dots, squares, rectangles and straight lines for a while, then try doing numerals freehand.
(Practice pieces from a trainee)
You need to learn what applicator tools suit you best, what to mix in, what different mix ratios do, how thick you need to let the mix get for different effects, how to keep it at that thickness, how to get it to flow over the hole in hands without falling through and how to make it glow evenly when dry without light or dark patches.
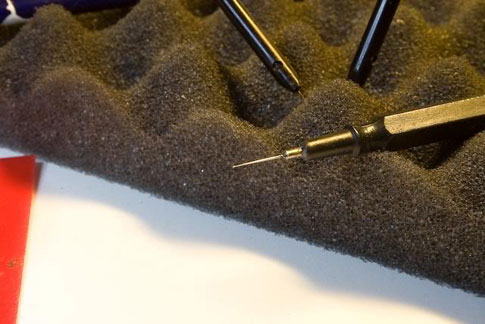
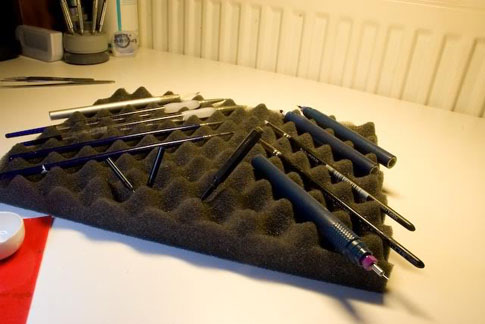
So;Applicators The most common is the watch oiler.
Any fine tipped tool can be used, even a pin, but it should have a smooth finish to encourage an even flow of lume onto the work-piece.
I use a variety of tools, including modified oilers, fine technical drawing pens, ‘colour shaper’ type silicon brushes and extra fine scalpels for controlling straight lines on awkward work.
The sloping surface provides a great advantage in that you can better control the size of the bead of lume you pick-up by touching your applicator down in the ‘shallow end’, or the ‘deep end’, or anywhere between.
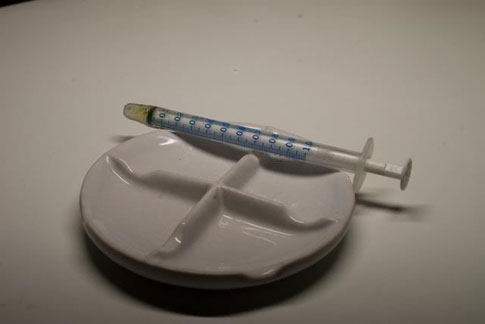
The most typical mix ratio is 1:1 pigment to binder by volume. Dedicate a small screwdriver or similar small flat bladed tool to use as your pigment scoop and measure, wiping clean thoroughly between uses. For the binder, you should try to use a small medicine syringe or a bulb pipette dropper to pick up and deliver your binder to the mix, and add by counting drops. This will help you developing a method for getting consistent mixing ratios. Mix ratios higher in binder will give a glossier finish and conversely high pigment to binder ratios will be matt finish. If you’re mixing your own blend of grain sizes (read back in Part One – The Theory to find out why you might want to), mix the powder thoroughly – really thoroughly, before adding the binder and if desired, grind the particles slightly as you mix to make it even more of a blend of sizes. Mixing is usually done with a small glass rod, such as the ones supplied in lume kits or, the silicon rubber ‘brushes’ known as colour shapers work well. Whatever you use, be prepared to keep stirring the mix throughout use to keep the particles evenly distributed within the binder, it also helps keeps the mix fluid.
Play around with these mix ratios and get a feel for how it affects application, colour, brightness and duration of glow. You can then fine tune the mixture with dilutor to increase flow, enable thinner applications (often useful if you want to do a multi-coat application) and then to extend the working life of the mix. In use, over time you will notice that the mix starts to get ‘stringy’ and, particularly if you’re using a blend of particle sizes, will get noticeably more grainy. This is when you need to add a tiny amount of dilutor at a time, and remix thoroughly. You may well need to wait a little while for the mix to start setting up again to where you want it. I always test by applying a drop on a piece of scrap after diluting to ensure it isn’t going to flow too much and get onto the dial surface and ruin it.
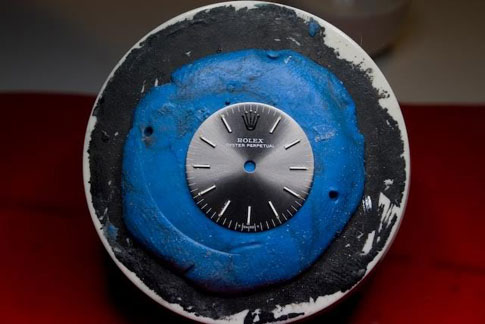
Luming Dials Wherever possible apply the lume to a smooth, bright white base coat. It makes a huge difference to the colour and effectiveness of the lume.
Sandwich dials might seem easy as you’re not having to be exact, but be aware of a few issues before you try one. When splitting the dial halves, ensure both halves stay perfectly flat, the slightest bend could make the dial unusable. When applying the lume, don’t put too much on, if it’s even the tiniest bit too high the dial wont seat back together properly. If the dial does get slightly bent or the two halves don’t mate back correctly, chances are that the dial will be too thick or flex slightly and either the second hand won’t go back on – or – it seems all right but falls off later because the dial flex pushes it off. By the way, it’s a common misconception that sandwich dials glow the brightest. Not in my experience. A sausage dial will typically have a greater lume area available to the light and so take on a better charge. The lume on a sandwich dial is at the bottom of a hole remember. The easiest dials to start with are the ones with simple dot hour markers. Dials with applied markers are ok but have very little room to add more lume without it overflowing the recess, so really benefit from removal of the old lume, and this needs to be done very carefully, on reps especially, as the markers are usually chromed plastic and will scratch very easily, or worse snap off from the dial if you get a bit heavy handed. Sausage dials and dials with lumed numbers need a bit of skill to develop before you try them.
Warning! Dial surface finish marks very easily. Anything that will come into contact with the dial (cloth, tissue, brush, Rub-Off, whatever) must also be absolutely clean to minimise the danger of marking the dial. You will need some A&F Rub-Off or Rodico (they do work differently so try both and see what you prefer) for dial cleaning before you start and you must ensure you’re working in as clean an environment as you can manage. You should also try to get an idea of what the existing dial finish is and how it will react to your lume binder if it does come in contact. Some are fairly friendly and will allow quick, minor adjustments to a straight edge for example without softening too much and marking or ruining the dial surface. If there’s the slightest amount on the back of the dial, test it there. If you can’t test, assume the worst and keep well within the markers. Also be aware that the applied lume will be softening the surface below it, try your best not to touch the dial surface with the tip of your applicator, especially if you are going back over an area. It’s one of the quickest ways of ruining a lume job. The skill is to just touch the edge of the bead of lume on your applicator to a central point on the part you are putting the lume on and then controlling the flow from applicator to dial by the height and speed of movement of the applicator bead. The slower you go, the more lume will flow to a given area. The lower you go, the wider the contact point of the bead will be.
Holding and working on the dial You will need to secure the dial to something to allow you to freely move the dial around without touching it and that will protect the dial feet from damage. I use an old, cheap plastic, three hole oil pot with a lump of Rub-Off on top to secure the dial.
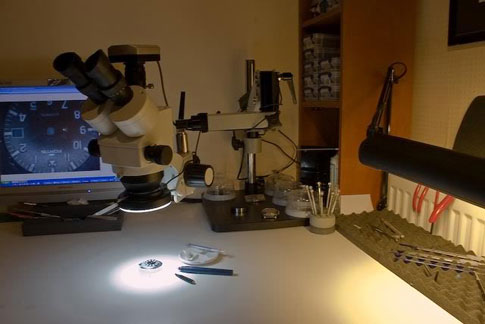
A lot of your choice will be dictated by your work table height and what you’re using for magnification. A typical loupe will mean that you need the dial 1-2″ away from your eye and you will probably need something tall to raise the dial for working, as very few desks are that high and you don’t want to spend too long hunched over. But at the same time, ideally, you should try and get a working position where your forearms are supported flat on the desk. This makes a huge difference in how steady your hands will be.
I use a stereo zoom microscope on a long reach arm to allow me to work at high magnifications for longer periods with a comfortable working distance between the objectives and the workpiece, but that’s a luxury only justified if it’s paying back it’s purchase price. My ‘scope also has a very bright, adjustable LED ringlight to illuminate the dial.
The three things you will really need to get if you want good results are:- • A good magnifier or loupe. I’d suggest that a 7x is a minimum, a 10x and a 20x is ideal. • A good light. This will make a huge difference to your work. A two or three tube, daylight balanced work lamp is the kind of thing you should be looking for. • A dust cover. Whenever you put the dial down, you should put a cover over it to prevent dust falling on it and sticking to the wet lume. A small drinking glass, plastic cup or anything like that will do the job, as long as it is spotlessly clean itself.
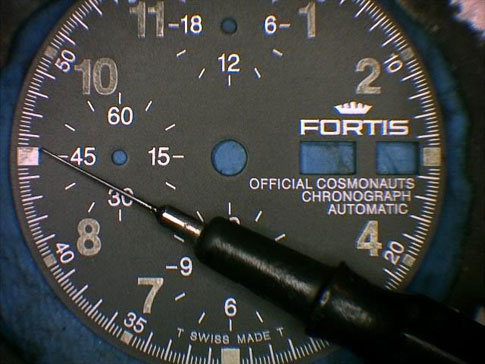
Applying the lume to the dial Other than doing a video, it’s difficult to actually demonstrate lume going down onto a dial, so the best I can do is offer some tricks and tips. • Pick up the right size bead of lume for the size of the detail you’re applying it to. Too much and it will flow over the edge of where you want it. Too little and you’ll spend forever applying little tiny dots that will make straight lines difficult and will probably take so long that you will keep loosing a ‘wet edge’ to flow the next bead into, leaving a very lumpy finish. Your goal is to pick up just enough to pull a bead of lume along the marker you are luming as far as you can in one go, without having so much that you will be running into the danger of bits of lume blobbing outside the area you want to cover. • If you’re trying for a really strong lume, try putting a first application on with a higher mix of large particle size pigment, but leave enough room for a second, top coat, where you use just fine grain particles and make a thin, glossy mix to put over the top as a finishing surface. • Keep a piece of pith wood handy for sticking your applicator into frequently to keep it clean. • Keep moving the dial holder around to permit your hand motion to be in its most natural direction. But be extra careful that your hand doesn’t then smudge anything you’ve already lumed. 👿 • Avoid caffeine. Yes really! Caffeine jitters might not normally be noticeable but when you are dealing with this kind of fine control it makes a difference. You may well also find that you are better able to do steady work at a particular time of day, for me it’s the late evening when I’ve unwound and relaxed. • Give your hand/eye coordination time to adapt. Working at high magnification, you should find that after a little while your brain adapts and will allow much finer control over your hand movement to fit in with the scale of what you are viewing.
Additional Notes Self-luminous compounds Self-luminous compounds provide permanent legibility over a long period of time without any prior activation from an external light source. The energy release of a radioactive isotopes decay is continuously converted into a weak light emission. With tritium for example, traces of a solid, tritiated polymer are coated on zinc sulphide crystals to act as a permanent energy source, only limited by the active life of the element. The first widely used self-luminous compound used to provide a glow in the dark feature was radium (hence the ‘Radiomir’ from Panerai). This radioactive isotope was used to excite zinc sulphide crystals to make them glow in the dark. Once the radioactivity dangers (radium has a half-life of 1600 years) – particularly to the workers applying the compound – were fully realised by the 1950’s, new self-luminous compounds using either the radioactive isotope of hydrogen, tritium, or a man-made radioactive element promethium, were developed and totally replaced the use of Radium. Promethium based lume was known as N-Lume after its developer Nemoto of Japan, but with a half-life of around three years, it’s use was as short lived as it’s effective life. Tritium has a half-life of 12 years and this eventually became a major drawback, as it’s ability to glow diminished visibly within a few years. Tritium is also used in nuclear fission and so the regulations that came in to control the import, export and storage of radioactive compounds made it’s widespread use more and more difficult. Tritium lume is still available from Tritec but under very strict regulations. This lead to the research that developed the phosphorescent rare earth based compounds, again led by Nemoto.
Phosphorescent compounds Phosphorescent compounds need activating or ‘exciting’ by an external energy source for them to glow. The first widely used phosphorescent pigment was Zinc Sulphide in the 1970’s.* Compared with the current compounds it’s not very bright and it only glows for a short time. Current compounds such as Luminova and SuperLuminova use Alkaline Earth Metal Aluminate compounds often just referred to as Strontium Aluminate, although that’s just one of the many variations used. Depending on the individual product, earth metals can include Strontium, Magnesium, Calcium, and Barium.* Silicon and Titanium can also be present.* The metal element is typically doped with Europium, the most reactive of the rare earth elements. These compounds do still have drawbacks. zinc sulphide decays over time in natural light, and the strontium aluminate type products degrade rapidly in the presence of water or moisture. As well as the gradual decay, this also limits the range of binders or mixing medium that can be used. To overcome this, some are available with the individual particles encapsulated in a plastic coating. A recent development is the use of Crystal Fluoaluminate Compound. These are very stable crystals of oxides and halides of alkaline-earth and aluminum, doped with rare-earth elements. These have the advantage of not being affected by water exposure.
Grain Size One of the key factors in how well a compound works is the size of the individual particles or grains. Smaller grains (<10 microns) are much easier to apply and give a smooth paint like finish but are less efficient. Large grains (75-100 microns) glow like a torch and will hold a charge for up to 36 hrs. So most manufacturers use varying blends of grain sizes to improve the performance. The larger particles improve the performance, while the smaller particles ‘fill the gaps’ between them, removing any ‘dead space’ and creating a smoother surface, so not as susceptible to micro shadowing reducing the effective charged area
Want to build a project yourself? The link at the bottom of this page will take you to another site with a large selection of parts but before you go below are some helpfuls tips.
Firstly you will need to consider what type of watch you are going to build. This site only deals with Vintage Panerai and nothing modern or new. If you are looking for a Vintage then you are in the right place.
Decide what movement you will use. The most popular are the Unitas 6497 (about $40 to $60) the Molnija (about $60 to $130) the Cortebert 616 (around $340) the Angelus 240 cal (from $800 to $2400) and the less common Rolex 618 ($2800 or more). If you are going to use a different type of movement then you need to consider whether it will fit inside the case and also whether there is a movement holder to to support the movement when its in the case.
Case: Check that the case you are planning to use is compatible with the upgrade parts that are available. Often people buy a case only to find that nothing will fit. The best cases to use are 3646 = River, Silix or the Vintage Watch Parts Case and the 6152 = Jackson, DSN or the Vintage Watch Parts Case.